Personal Protective Equipment (PPE)
Summary of Equipment
Respirators: We recommend you review the information about the respirator you will be using before you don it for the first time. Each respirator has different instructions and accompanying videos for donning, doffing, decontamination, and storage.
- Elastomeric - Most FPI employees have been issued this type, which is reusable and has enclosed cartridges. They are fit-tested so employees must use their own assigned elastomeric respirator.
- N95 - During COVID-19, N95s are for extended use. N95s may be worn for several hours or shifts as long as the user can achieve a seal-check and the mask has not become visibly contaminated. We recommend that employees write their name on the elastic strap of their respirator. After use, the respirator should be stored in a paper bag labeled with the employee’s name and date. If possible, it is preferable to wait 5 days before wearing the same N95 again. Employees must have been fit-tested and use the size and brand assigned.
- Powered Air Purifying Respirator (PAPR) with Hood - This can be used by an employee who has not been fit tested or who has facial hair.
Gloves: Any standard examination gloves.
Gown: Disposable contact isolation gown that is AAMI level 2 (flud-resistant) or higher.
Eye Protection: Used to protect your eyes from droplets if the patient coughs or sneezes:
- Recommend face shields for use with Elastomeric and N95 respirators.
- If face shields are not available, goggles are appropriate eye protection.
- PAPR hood has a face shield.
Topics to Keep in Mind While Caring for Patient
Donning (Putting On) PPE
The following are suggestions and steps for donning/doffing all PPE except respirators. Separate pages about the different respirators include important information and specific instructions for all three types of respirators.
You will need:
1 Pair of Gloves: Any standard examination gloves.
Gown: Disposable contact isolation gown; AAMI level 2 (fluid resistant) or higher.
Eye Protection: To protect your eyes from droplets if the patient coughs or sneezes:
- Recommend face shields for use with Elastomeric and N95 respirators.
- If face shields are not available, goggles are appropriate eye protection.
- PAPR hood has a face shield included.
Donning PPE: Before opening the door and entering the patient's room:
- Determine where you will deposit your contaminated reusable equipment when you come out, such as the elastomeric respirator, eye protection, or PAPR. Set out receptacles where you will deposit these items after you exit the room.
- Remove unnecessary personal clothing and items (such as a laboratory coat).
- Inspect PPE prior to donning.
- Perform hand hygiene.
- Put on gown.
- Put on gloves, ensuring these gloves cover the wrist cuffs on the gown.
- Put on respirator (elastomeric || N95 || PAPR (everything except hood).
PLEASE NOTE: When using a PAPR the gown must not obstruct the air intake on the PAPR motor. Click here to view instructions (third tab) for putting on the PAPR*.*For FPI employees who use a PAPR in the UMMC (except for Pediatric Specialty Practice), the protocol sequence using the hospital PAPR is different due to use of different equipment. - If wearing PAPR, turn on the PAPR and put on PAPR hood.
- You are now ready to enter the patient’s exam room.
Doffing (Taking Off) PPE
The following are suggestions and steps for donning/doffing all PPE except respirators. Separate pages about the different respirators include important information and specific instructions for all three types of respirators.
Doffing PPE: Before leaving the patient's room:
- Disinfect gloves.
- If you were using a PAPR, DO NOT turn off the PAPR. The hood stays on and the hose remains connected. Unfasten the belt and set the battery pack and belt on a table or chair nearby.
- Remove gown:
- Unfasten gown.
- Reach hands across chest and remove gown by sliding over the sleeves; this should turn the gown inside out
- Pull the gown away from the body causing the outer pair of gloves to invert or be removed.
- Dispose of gown and gloves in biohazard waste container.
- Perform hand hygiene.
LEAVE THE ROOM and CLOSE THE DOOR. Perform hand hygiene after closing the door. - Remove eye protection and place in the receptacle you placed outside the room before going in.
- Remove respirator (elastomeric || N95 || PAPR (including hood)
- Remove elastomeric and place in receptacle or sink for decontamination. Do not get cartridges wet.
- Remove the N95 respirator and follow guidance about storage and processing for reuse.
- Being careful not to invert the PAPR hood, remove PAPR hood and filter assembly and set in receptacle for decontamination
- Remove inner gloves and place in biohazard waste container.
- Review body for contaminants.
- If there are visible contaminants, remove affected clothing if possible.
- Wash affected skin with soap and water.
- Shower if this is available.
- Decontaminate reusable equipment according to specified protocols below.
Decontaminating Reusable Equipment
The following wipes effectively kill coronaviruses:
- Oxivir TB
- Caviwipes 1
- Sani-Cloth Prime
Wearing clean gloves, using wipes above, decontaminate goggles, using one of these wipes for at least one minute. Rinse in water or wipe with a wet paper towel afterward to remove cleaning agent residue.
Decontaminating reusable equipment and PAPR and hood:
- Dispose of wipes used in decontamination in biohazard bags.
- Decontaminate the room using usual protocol for contact precautions before using it again.
Decontaminating Reusable Elastomeric Respirators
Wearing clean gloves, use Caviwipe1, Oxivir Tb or Sani-Cloth Prime wipes, decontaminate 3M 7500 series elastomeric respirator:
- Remove filters and strap harness
- Wipe the outer surface of the facemask with one wipe (1st)
- Wipe the inner surface of the facemask with a new wipe (2nd)
- Wipe filters with a new wipe (3rd)
- Wipe strap and harness with new wipe (4th)
- Allow to air dry for 2 minutes (X2 recommended contact time)
- Remove any cleaning agent residue with a towel or towelette wetted with water or saline
- Let air dry
- Reassemble the respirator with filters and strap harness, place in storage bag/container.
IMPORTANT: Make sure the filter is attached correctly. You will hear three snaps (one loud, two soft). snaps back in place.
Decontaminating PAPR and Hood
Wearing clean gloves, use Caviwipe1, Oxivir Tb or Sani-Cloth Prime wipes, decontaminate 3M 7500 series elastomeric respirator:
- Put on disposable gloves
- Ensure nearby waste receptacle
- Detach PAPR Hood from hose
- Detach hose from battery/filter/blower assembly
- Detach belt assembly from battery/filter/blower assembly
- Decontaminate the outer surface of the battery/filter/blower assembly with an approved decontamination wipe. Dispose of the wipe and set battery/filter/blower assembly aside into clean area
- Decontaminate the outside of the hose with an approved decontamination wipe. Dispose of the wipe and set the hose aside into clean area
- Decontaminate the outside of the PAPR hood with an approved decontamination wipe. Dispose of the wipe and set battery/filter/blower assembly aside into clean area
- Decontaminate the belt assembly with an approved decontamination wipe. Dispose of the wipe and set battery/filter/blower assembly aside into clean area
- Moisten a clean cloth or towel with clean water and wipe down the outside surface of the battery/filter/blower assembly, the outside of the hose, the outside of the PAPR hood, and the belt assembly to remove residual cleansing agent. Dispose of wipes
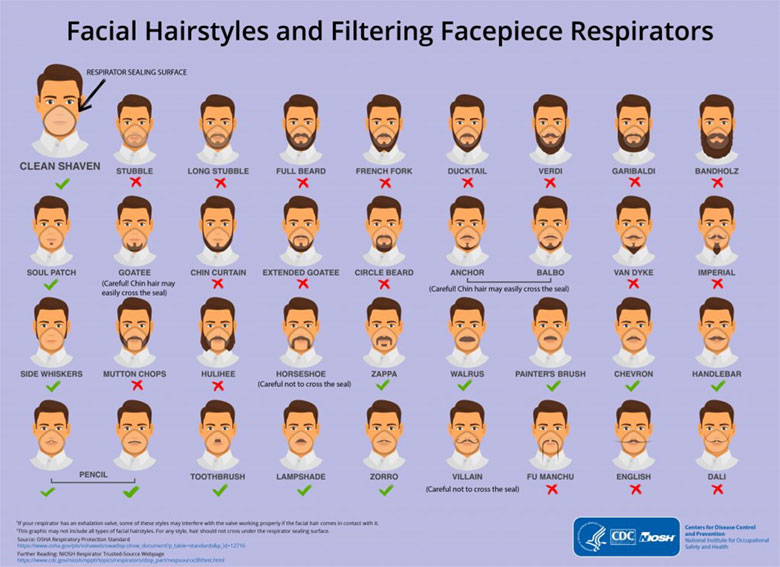
Facial Hairstyles
PLEASE NOTE: If facial hair interferes with wearing either the Elastomeric or or N95 respirators, you have 2 choices. You may wear a PAPR or you can shave your facial hair to provide a clean-shaven, smooth surface at the sealing edges of the respirator. Below are some graphics that will aid in determining whether your facial hairstyle is respirator-ready or not!
What about Facial Hair?
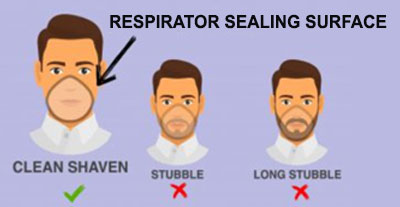
Clinical practices should keep disposable razors on hand for employees who may need to shave facial hair for effective respirator seal.
Facial Hairstyles and Filtering Facepiece Respirators
Both reusable elastomeric respirators & N95 respirators require user to be clean-shaven at the sealing surface.
Click to enlarge the image below
Elastomeric Respirator
This page contains links for using the elastomeric respirator, including video demonstrations of decontaminating your respirator between patient encounters and end-of-shift cleaning.
Appropriately Don Elastomeric Respirator
- Ensure filters are securely attached to the elastomeric respirator.
- Don the elastomeric respirator and tighten straps
Please note: The respirator should fit snugly against your face. - Perform a negative pressure seal test before moving to a potentially contaminated area:
a. Pinch both filter cartridges closed at the same time.
b. Inhale gently for 10 seconds.
The seal is good when the respirator collapses and remains collapsed against your face. You may release the filter cartridges and breathe normally.
Please note: If the facepiece did not collapse or if any leakage is noticed, readjust the straps and perform the test again. If a leak remains, the respirator will not provide adequate protection and must not be used.
Decontamination Between Patients
Seeing multiple patients requires decontamination of the respirator with each new encounter! We have some videos on how to decontaminate your Elastomeric respirator below:
End of Shift Decontamination
All done with your shift/clinical day? Be sure to decontaminate your respirator before you head home!
Decontamination Protocol for Reusable Elastomeric Respirators
N95 Respirator
Donning
- Perform hand hygiene before putting on respirator.
- Make sure you have the correct size of respirator and that there are no defects.
- Hold the respirator in the palm of your hand with nosepiece at fingertips and the straps facing the floor.
- Position the N95 under your chin with the nosepiece up.
- While holding the N95 in place, pull the top strap over your head so it rests high on the back of your head.
- Pull the bottom strap over your head and position the strap around your neck, below your ears.
PLEASE NOTE: If you have long hair, the strap must be positioned beneath your hair. - Untwist the straps.
- Using both hands, mold the nosepiece of the respirator to the shape of your nose by pushing downward and outward while moving your fingertips down both sides of the nose piece to obtain a good seal.
- Perform a fit check by placing both hands completely over the respirator.
PLEASE NOTE: BE CAREFUL NOT TO DISTURB THE POSITION OF THE RESPIRATOR! - Exhale sharply
- If air leaks around your nose, adjust the nosepiece as described in STEP 8 above
- If air leaks at the respirator edges, adjust the straps back along the sides of your head.
- Perform a fit check again if an adjustment is made.
- Perform hand hygiene.
Doffing
After leaving patient's room (where you have already removed gloves and outer gown, placing them in the appropriate container) and closing the door:
- Perform hand hygiene
- Pull bottom strap over your head
- While maintaining your hold on the first strap, use your other hand to pull the top strap over your head
PLEASE NOTE: Do not touch front surface of the respirator - Be sure to extend your arms straight out in front of you with the respirator in order to avoid contaminating your scrubs
- if N95 will be reused or used all day, place in a paper bag
Decontamination and Reuse of Filtering Facepiece Respirators (CDC.gov)
PAPR (Powered Air-Purifying Respirators)
The links below provide information about use of a PAPR, including steps to don this respirator, assemble the PAPR, and cleaning a PAPR after use.
Donning/Doffing PAPR
- Check PAPR battery to ensure an appropriate charge.
- Check that hose is securely attached from the filter assembly to the PAPR hood.
- Don PAPR assembly and turn the power on.
- Put on the hood after donning other pieces of PPE.
Decontamination checklist for PAPR
Current EPA-approved disinfectants for COVID-19 (epa.gov)
- Verify the wipe's effectiveness against human coronavirus (aka COVID-19)
- Put on disposable gloves
- Ensure nearby waste receptacle
- Detach PAPR Hood from hose
- Detach hose from battery/filter/blower assembly
- Detach belt assembly from battery/filter/blower assembly
- Decontaminate the outer surface of the battery/filter/blower assembly with an approved decontamination wipe
- Dispose of the wipe
- Place the battery/filter/blower assembly aside in a clean area
- Decontaminate the outside of the hose with an approved decontamination wipe
- Dispose of the wipe
- Place the hose aside in a clean area
- Decontaminate the outside of the PAPR hood with an approved decontamination wipe
- Dispose of the wipe
- Place the PAPR hood aside in a clean area
- Decontaminate the belt assembly with an approved decontamination wipe
- Dispose of the wipe
- Place the belt assembly aside in a clean area
- Ensure all surfaces are exposed to the decontamination solution for the recommended contact time. Different wipes have different contact times, which you can view at the EPA website
- Remove residual cleansing agent. Moisten a clean cloth or towel with clean water and wipe down the outside surface of the battery/filter/blower assembly, the outside of the hose, the outside of the PAPR hood, and the belt assembly
- Dispose of the cloth or towel in the appropriate container