In this article [jump to a section]:
We've enabled several features to make collaborating in Teams with our partner organizations on campus a little easier. Read on to learn about the nuances of working with UMB, FPI and UMM.
Switching Organizations
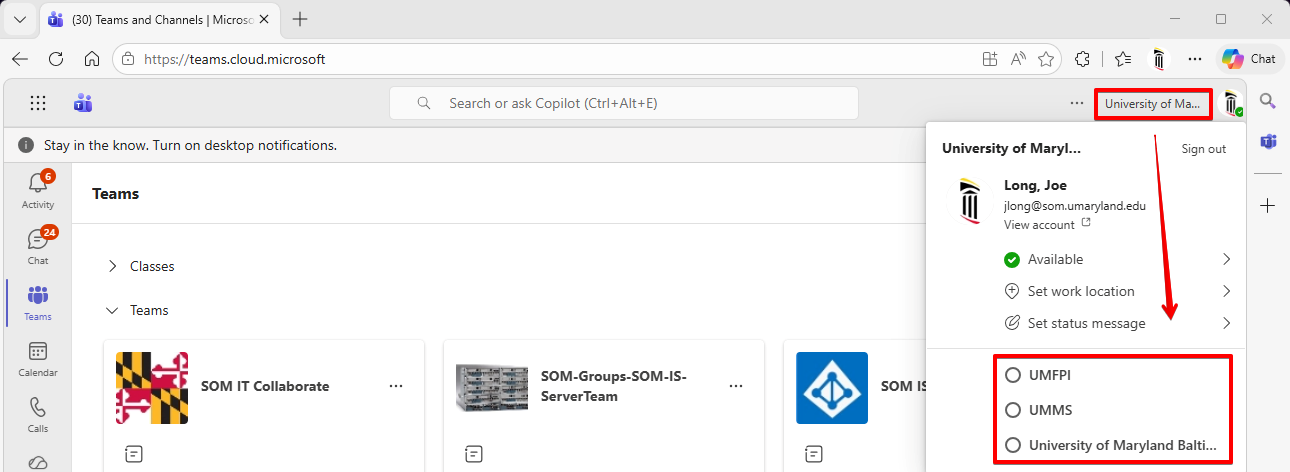
Teams will open in your home organization (SOM). This will show all Teams that you're a member of, that belong to SOM. Click here to show the other organizations that you have a Teams membership in.
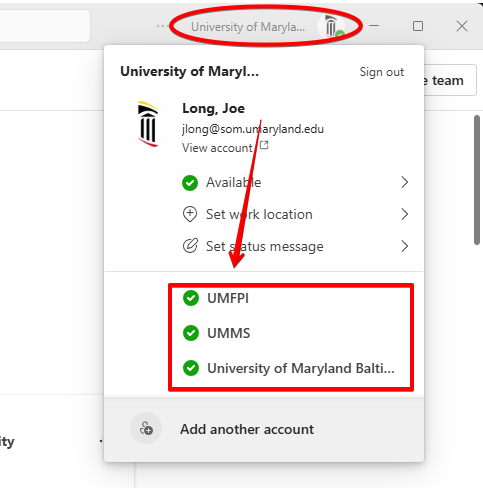
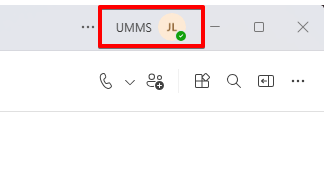
Now I've switched to the UMMS organization and I can see all of the Teams I'm a member of here.
You may not see all campus organizations here. You'll only see organizations which have invited you to a Team. You may also have other organizations listed here - other universities or research centers you may collaborate with.
You can edit this list, if you are a member of a Team in an organization that you don't participate in any longer. Click the ellipses > Settings > Accounts and orgs.
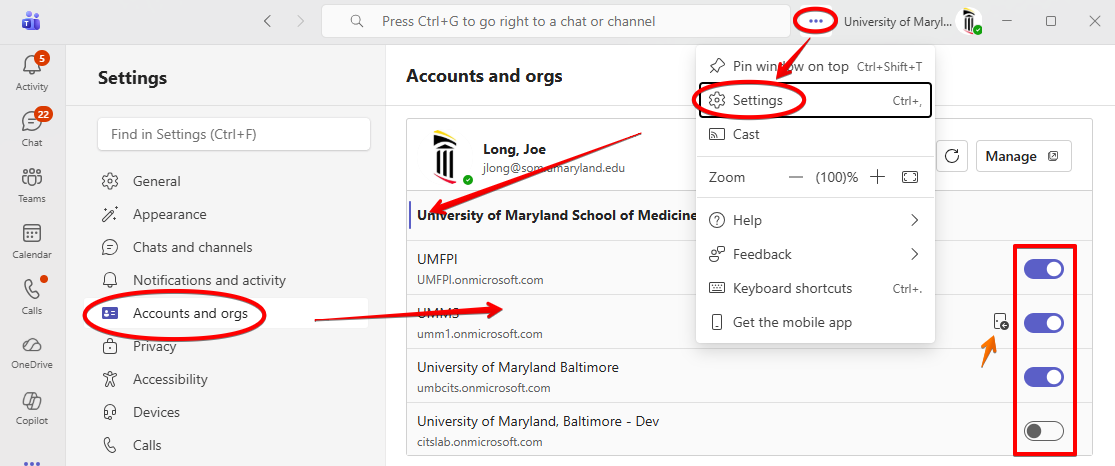
You can hide any organization listed here. You can also see a door icon here, which allows you to leave an organization altogether. You're permitted to leave UMM, as well as any other outside organization, because you are a guest in their organization. You are a member of UMB and FPI, so you cannot leave those organizations. You can leave individual Teams, however.
See here the differences between my memberships in FPI and UMM.
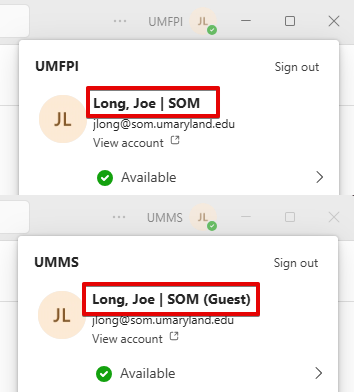
For learn more about the differences are between being a member and a guest, skip here.
Multiple Instances of Teams
If you find switching between organizations cumbersome, and you work in several organizations often, you can have multiple instances of Teams open at the same time. Use a web browser to do this.
Open https://teams.microsoft.com
Click your home organization in the upper right corner, and choose the organization you'd like to display.
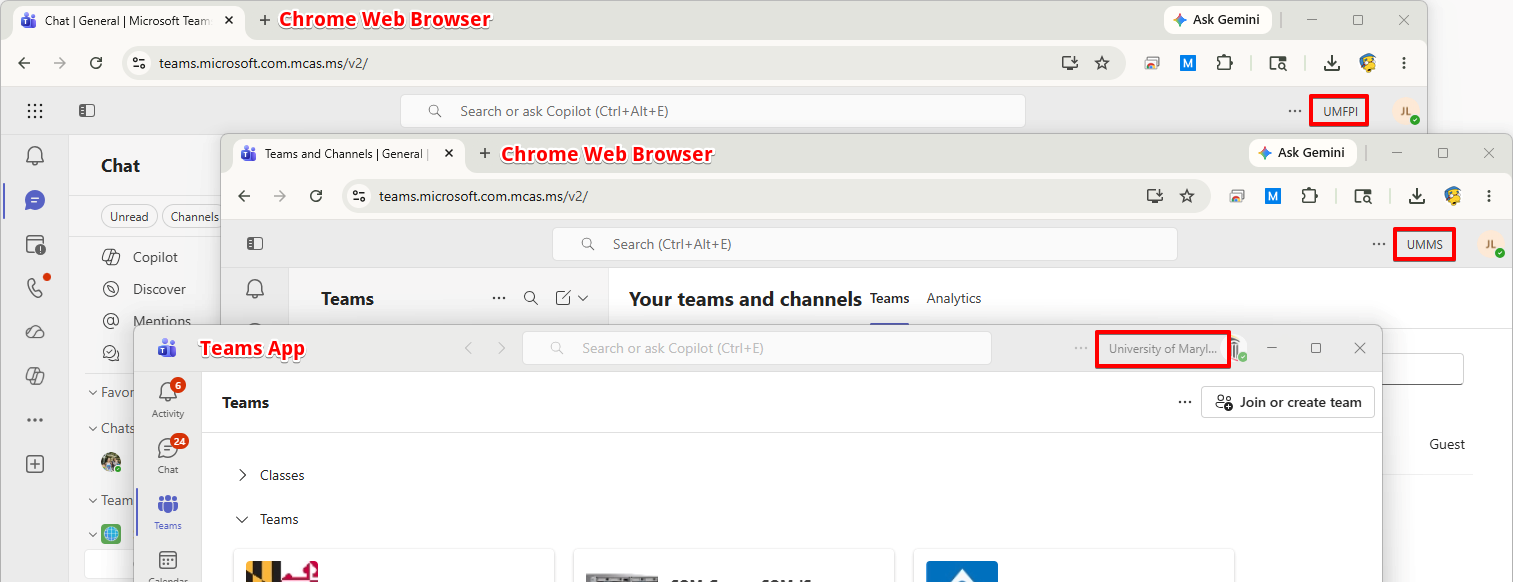
You can have multiple tabs open, each set to a different organization. Here are two tabs open simultaneously in Chrome, and the Teams app, each set to a different organization.
You can stop here, or you can go one step further and pin the web version of Teams as an app.
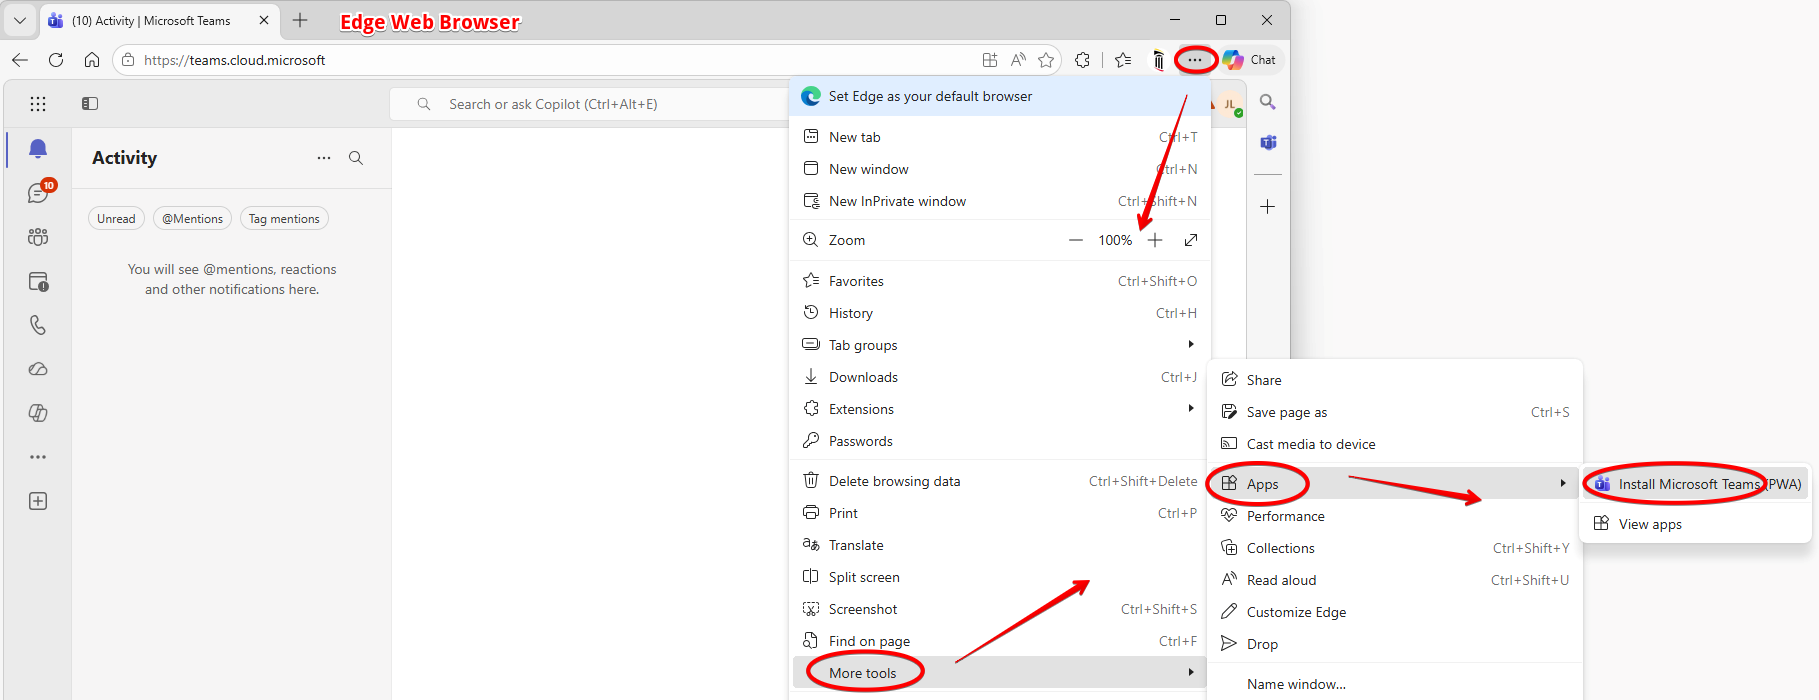
The directions differ depending on your web browser. In Edge, click on the ellipses (in Edge, not in Teams) > More Tools > Apps > Install Microsoft Teams (PWA).
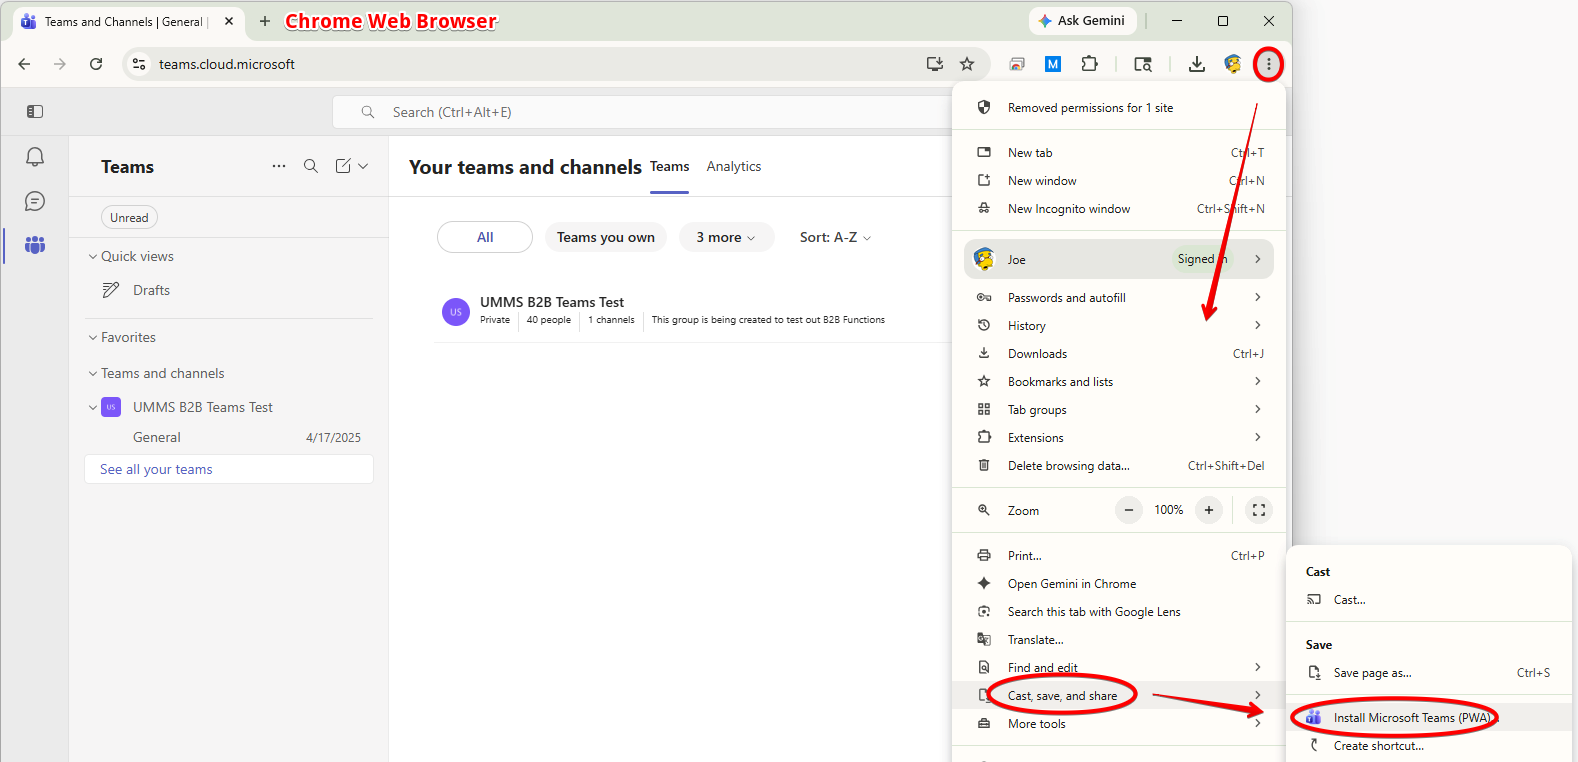
In Chrome, click on the ellipses (in Edge, not in Teams) > Cast, save, and share > Install Microsoft Teams (PWA).
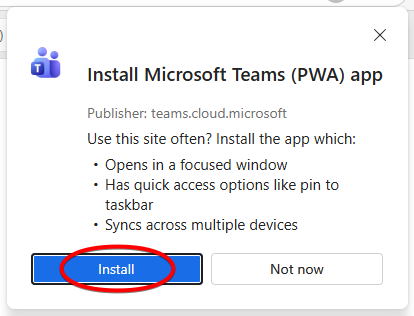
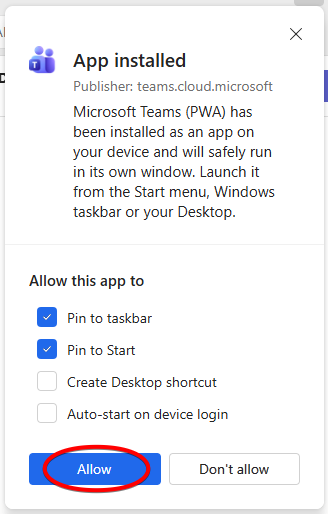
You'll receive two pop-ups. Click Install and then Allow.
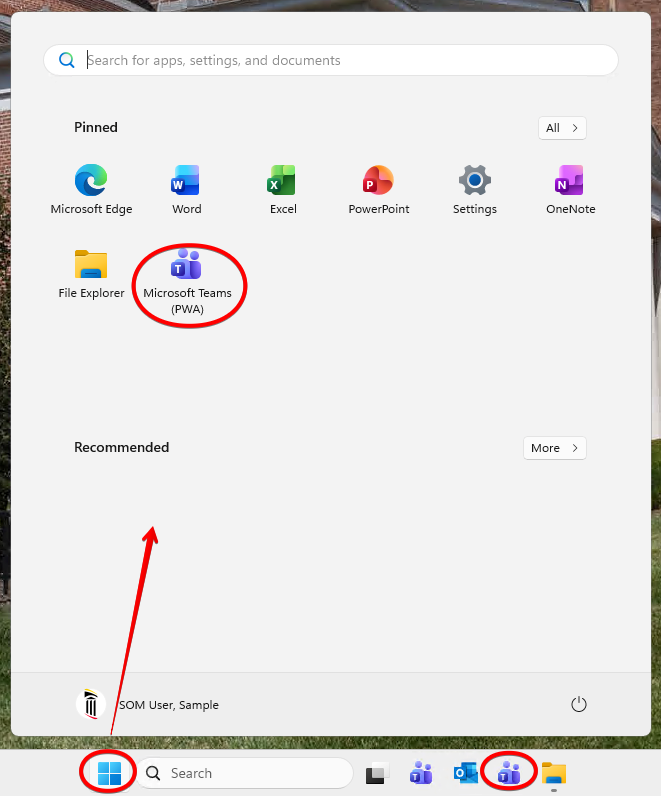
You can now find this pinned to your taskbar and start menu. ! Please note that this cannot pin a specific organization within Teams, but it will give you a faster way to open Teams within a web browser so that you can open a second organization.
Contacts
Contacts from our partner organizations on campus will have their organization code appended after their name, like this:
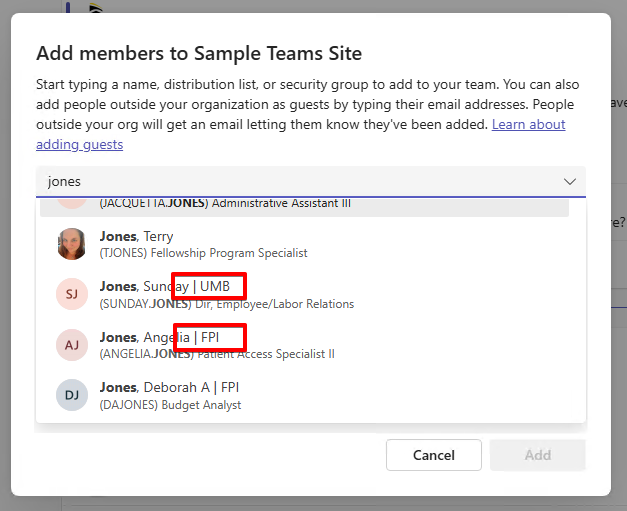
These will say | SOM , | UMB, | FPI or | UMM. You will only see the org codes of the partner organizations, and not your own. This means you should never see a contact with | SOM after it, but the other organizations will see it after your contact info.
In our early stages of adoption, you may have seen two entries for a user when sharing a file, tagging them in a conversation, or adding them to a Team. This was a result of migrating our way of syncing contacts. This has been resolved. If you do see multiple entries for a user, they more than likely have accounts in multiple organizations.
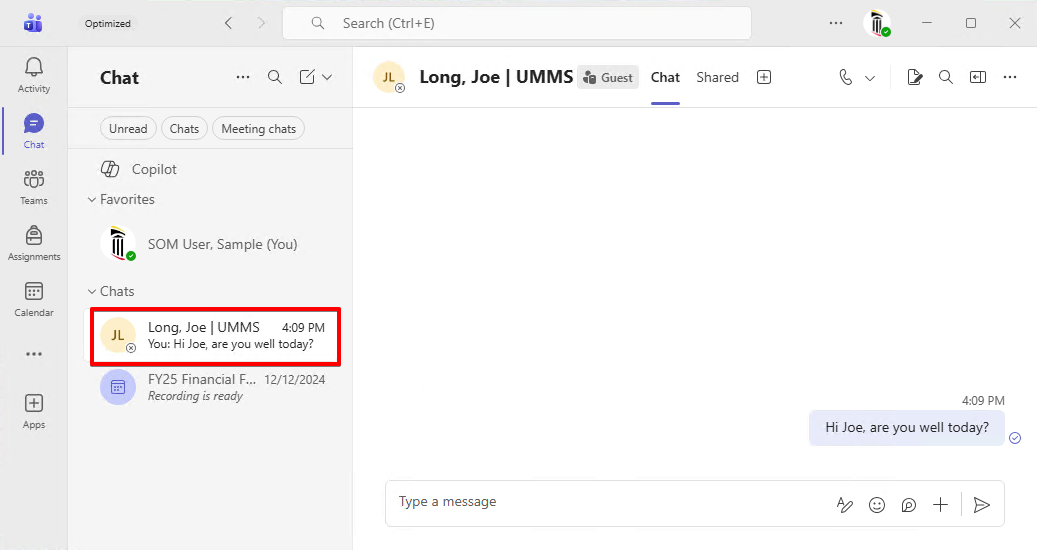
Previously, when messaging a user from another organization, you'd have to either switch to their organization, or be very particular about which contact you selected. With all campus organizations now syncing contacts, your chats can all be in your home organization, and you will have only the correct contact available to choose.
Unified Notifications
Teams has a feature that will show you notifications from all of your organizations in one place. In the lower left hand corner, click the icon with a person and a bell. You'll see each organization listed here with new notifications beneath them.
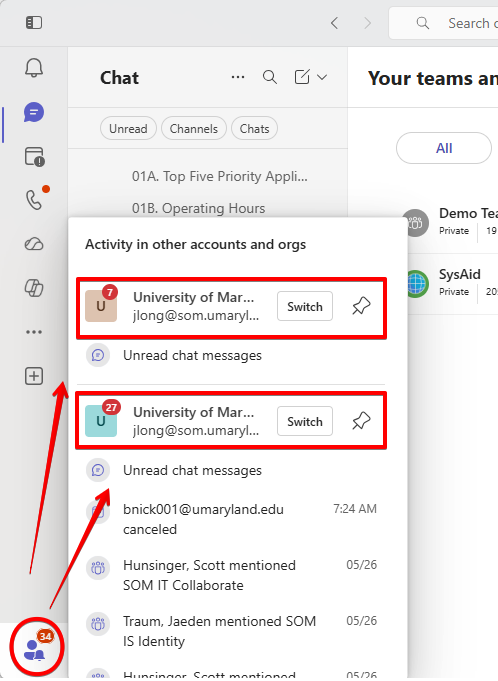
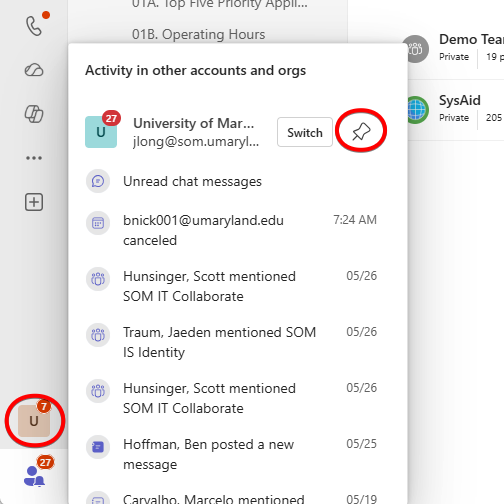
You can pin these organizations, and they will appear separately on the left bar.
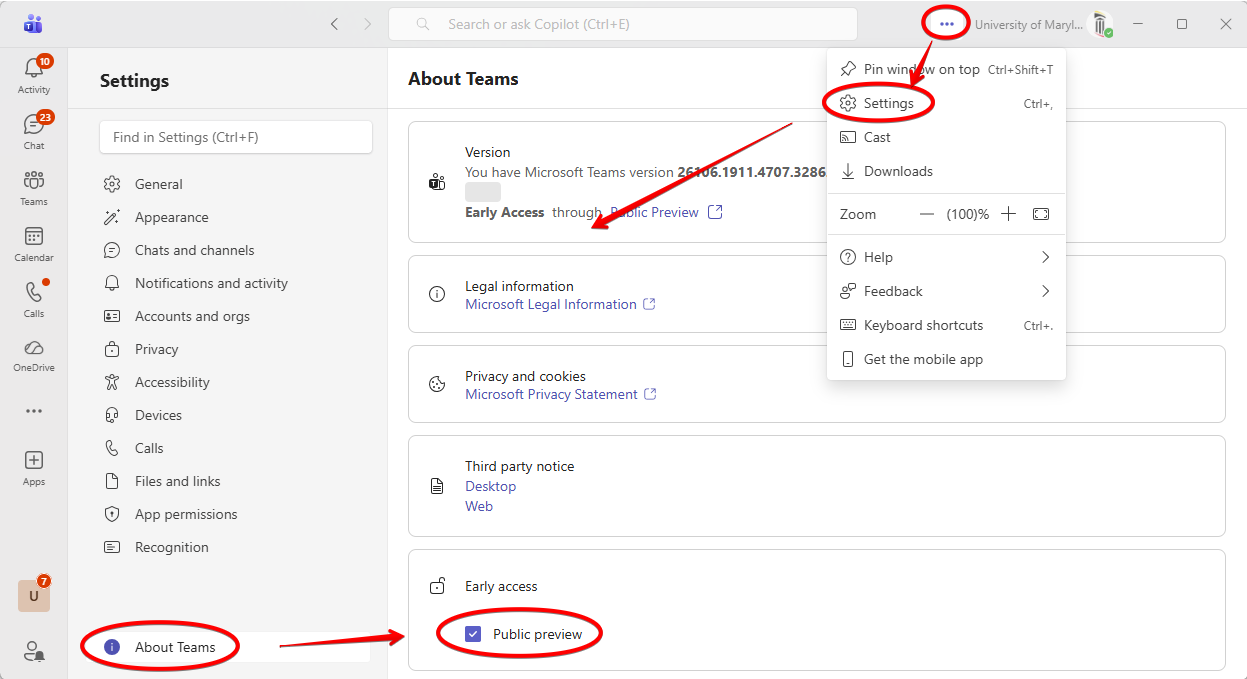
If you do not see this feature, follow these steps to enable public preview. Click on the ellipses > Settings > About Teams > Public preview.
Guest vs Member
The terms guest and member are used to refer to multiple things, so let's break it down.
When a user has access to anything in an external organization, such as a Team or a OneDrive file, they have a special kind of account in that organization which works like a visitor's badge. This special account can be a guest or a member. These accounts are usually guests. Anytime you invite someone from an external organization such as UMD or UMBC to collaborate with us, they will have a guest account in our organization. This gives them very limited access.
Previously, "visitor badge" accounts for users in our partner campus organizations (UMB, FPI & UMMS) were created as needed, only when they were first invited to access a Team or file. With our new collaborations settings, all users on campus have these accounts created in all other campus organizations automatically. For SOM, UMB and FPI users, these "visitor badge" accounts are created as member accounts, not guest accounts.
Teams also uses the terms guest and member, as well as owner. Guest "visitor badges" will become guests in Teams. Member "visitor badges" will become members in Teams. File access and conversations work the same for guests and members in Teams, but there are a few differences. Guests cannot add apps or tabs to a Team, create meetings within a channel, attach files in a chat, or search within files (as opposed to just searching filenames). Members can do all of these things.
Shared Channels
For a full breakdown on different kinds of channels within Teams, see this article.
When you invite someone from another organization to a shared channel, it will display in their home organization. This eliminates the need for that user to switch organizations.
This applies to the channel itself, and not the whole Team. If you have a multi-channel Team where data and conversations are segmented, a shared channel may not be the best solution. Also, the only people who can be given access to a shared channel are our campus partners (UMB, FPI and UMMS). If you require other outside collaborators to have access to the channel (UMD, UMBC, etc.), this is not a viable solution.
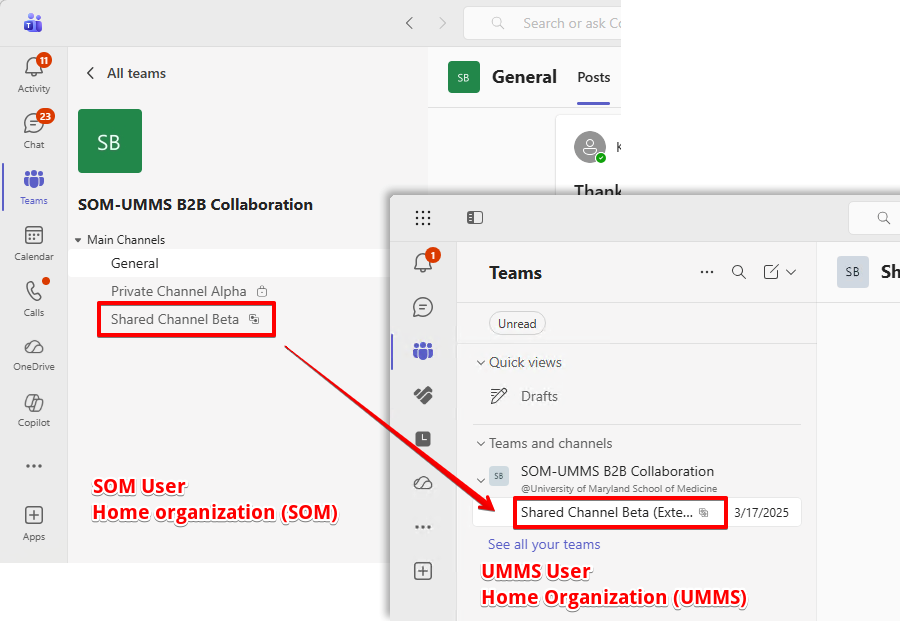
Here is an example of a Team in the SOM organization. An UMMS user has been granted access to the shared channel within it. It appears for that user in their home organization. Notice that only the shared channel appears, and the General channel does not.
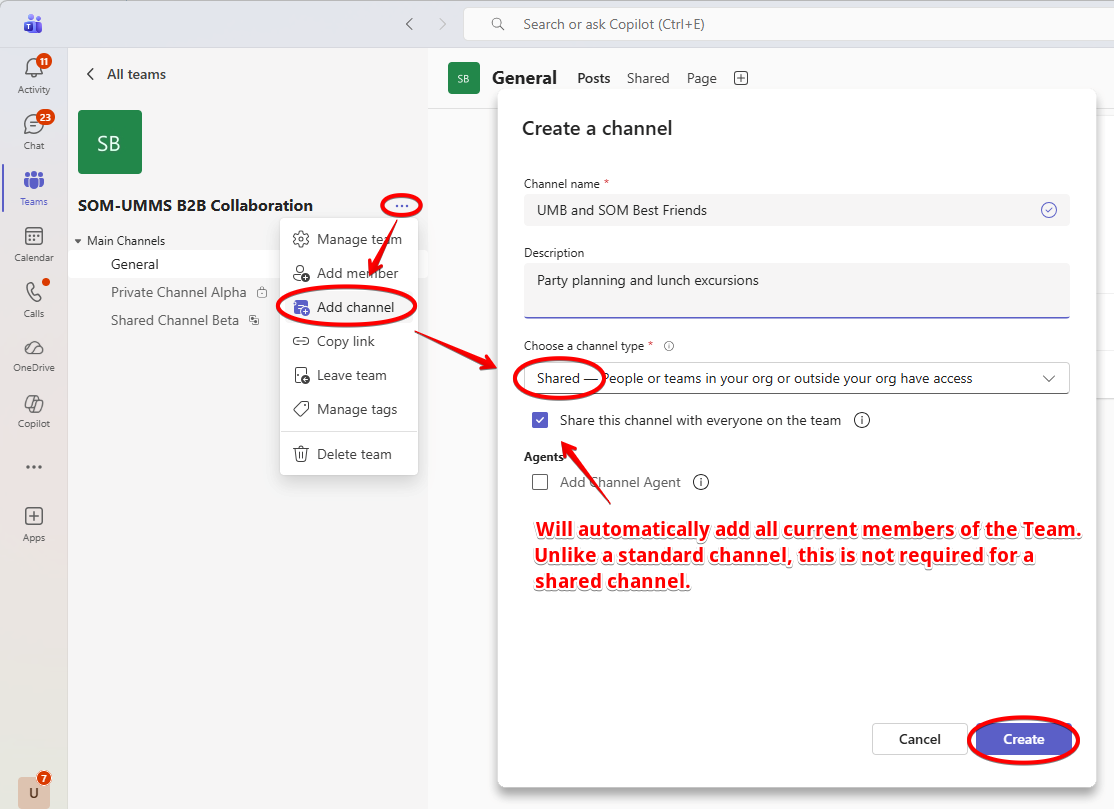
To create a shared channel, click the ellipses next to the Team > Add channel > choose Shared as the type.
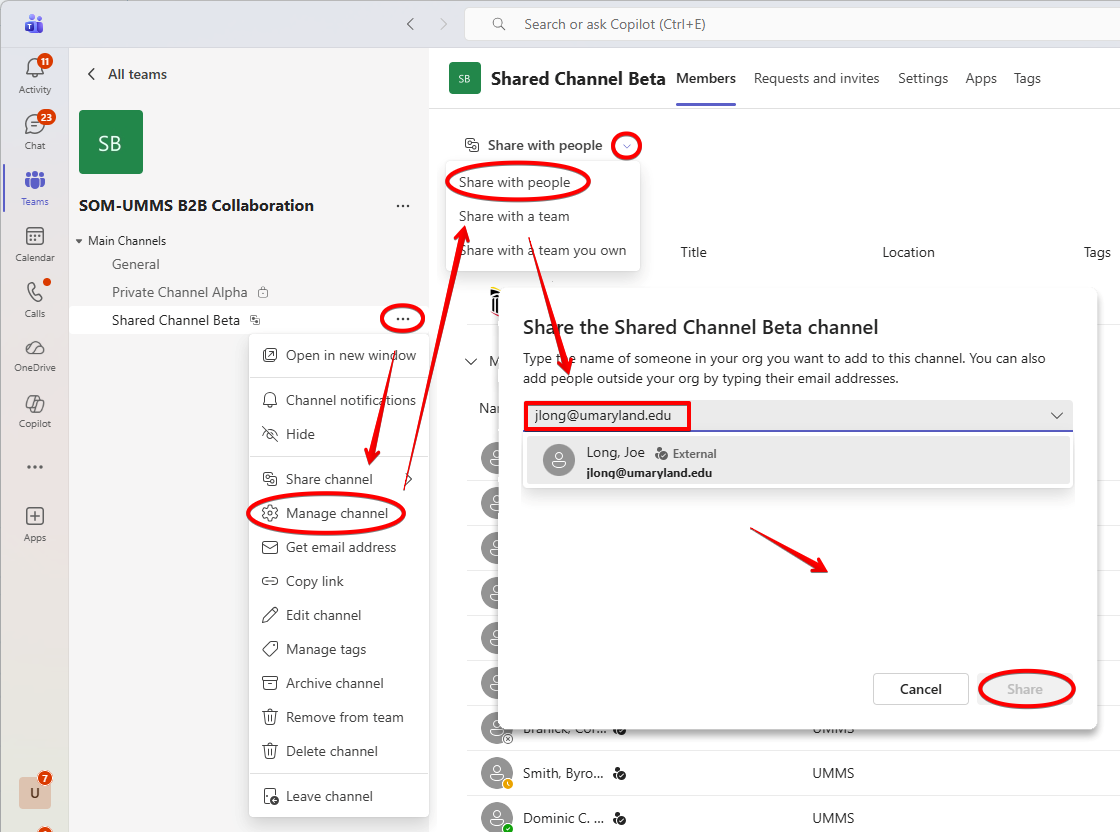
Once created, add users to the shared channel by clicking on the ellipses next to the channel > Manage channel >Share with people > add users > Share.
Bypassing the Lobby
Users from our partner organizations will now bypass the lobby in Teams meetings by default.
This will affect all future meetings. Meetings that have been previously scheduled may not update automatically. You can update existing meetings, or change the settings when you create a new meeting.
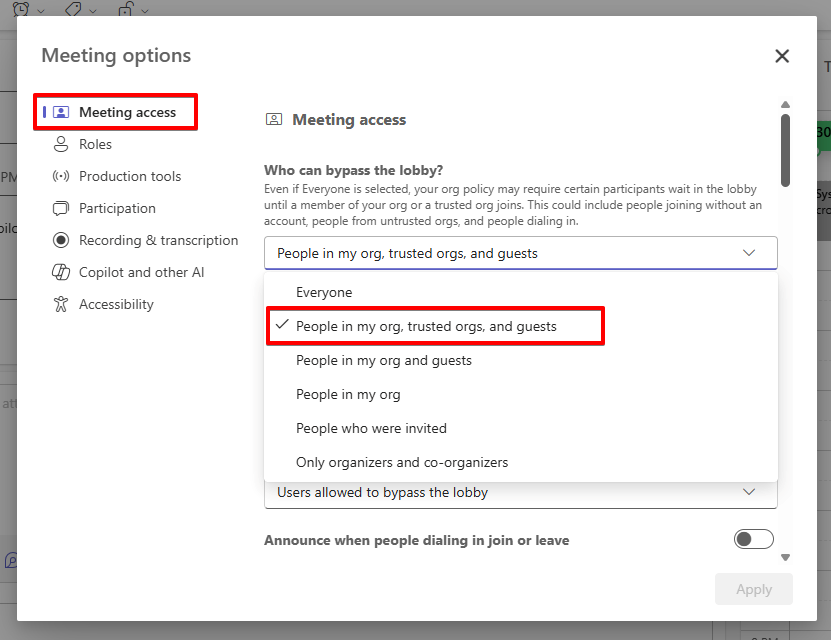
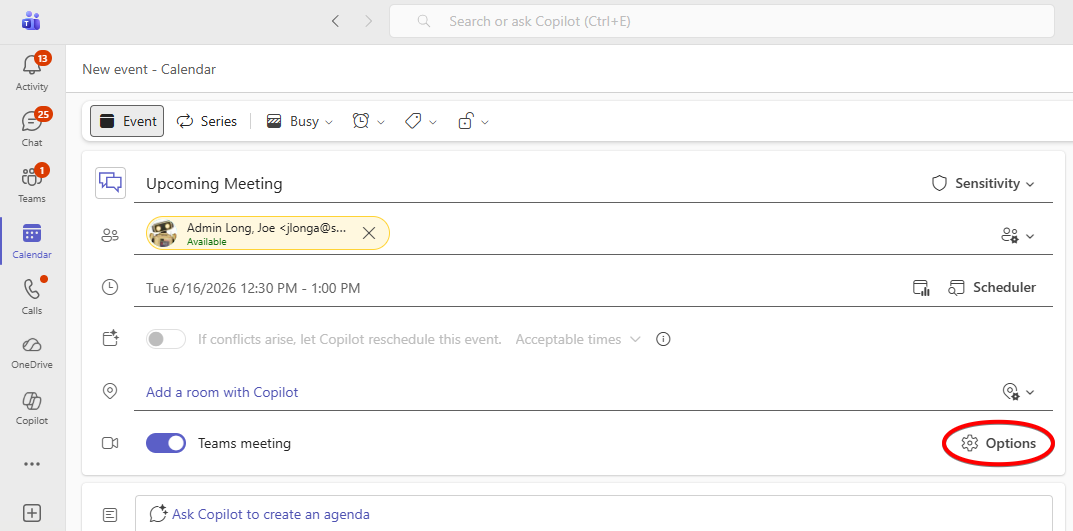
Go to Options.
Users from UMB, FPI and UMM fall under the trusted orgs category.