On Android only the Outlook app is supported. This is a guide only. Some screens and steps may vary depending on device make, model, and Android version. Please note that some Android devices may be incompatible with this service.
Install Intune MDM
(Required Step) Information and instructions can be found under the Offices of the Dean, Office of Information Services here:
Install Microsoft Outlook
The Department of Medicine Information Systems has standardized on using the Microsoft Outlook app for a consistant user experience and ability to provide support. Setup and support of native mail applications is not provided.
- Download the "Microsoft Outlook" app from the work profile Play Store.

- Open the app and follow the prompts to setup/login.
Outlook Contacts
Only contacts in the main Contacts folder (i.e. Contacts - username@som.umaryland.edu) will sync to a mobile device using the Outlook App. If you have contacts in any other Folder/Address Book, these must be moved to Contacts - username@som.umaryland.edu if you wish to sync them. It is highly recommended that you take this opportunity to cleanup and correct your contacts.
- Open Outlook on your computer and go to the People view or the People app in Office 365 on the web.
- Locate any additional contacts folders and select the contacts you wish to sync.
- Move them to your main Contacts folder. Contacts - username@som.umaryland.edu
Enable Contacts Sync in the Outlook App
- Open the Outlook App.
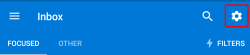
- Tap the Settings icon.
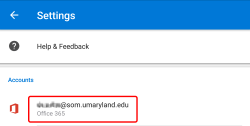
- Tap on your Account.
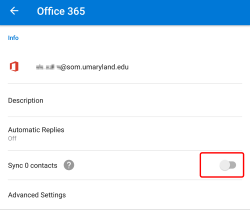
- Toggle the Sync contacts to On.
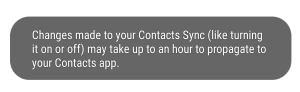
- Note that contact sync may take time to begin.
Disable Native App Sync
Some devices may automatically setup accounts and enable syncs. This can cause confusion and duplicaiton. Should you discover additional syncing occuring please follow these steps to limit syncing to only the Outlook App.
- Open Settings.
- Locate the Accounts section.
- Identify the correct account and open it, it will typically be "Microsoft Exchange ActiveSync" but the name may vary.
- Toggle the sync settings as desired. Typically this will be to turn off undesired content.