Remote Meeting Applications
There are multiple remote meeting applications that you have access to. There are advantages to each of them. Below is a comparison chart, followed by more detailed information on each.


Teams
What is Teams?
Teams is Microsoft 365's collaborate platform. It brings file sharing, messaging and video conferencing together into one app. It is fully integrated with Microsoft 365. All data and communications in Teams is covered by a HIPAA Business Associate Agreement, so it is suitable for PHI and PII data storage and sharing. Although Teams can perform many functions, the scope of this article will focus just on its remote meeting capabilities.
How do I login to Teams?
Teams can be accessed at https://teams.microsoft.com.
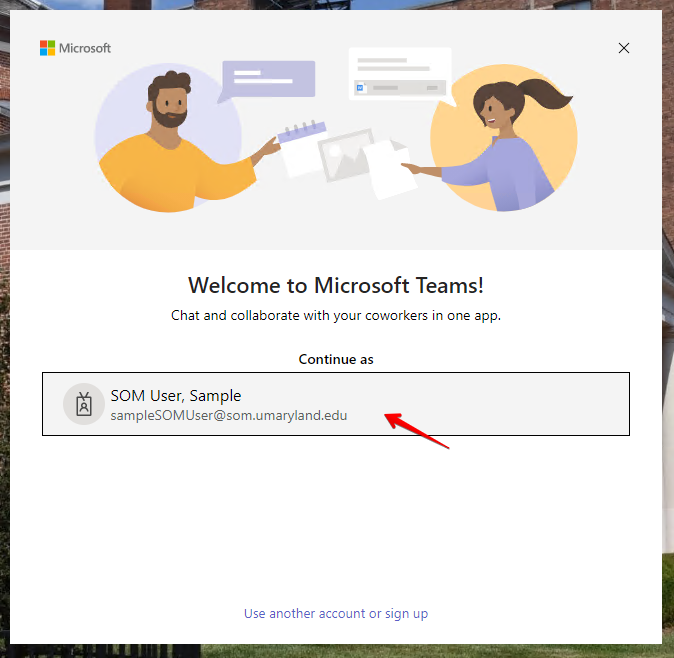
Teams will likely know who you are the first time you login. Just select your name and enter your password. You should be automatically logged in afterwards.
How do I create a meeting in Teams?
In Teams, go to Calendar > New meeting. 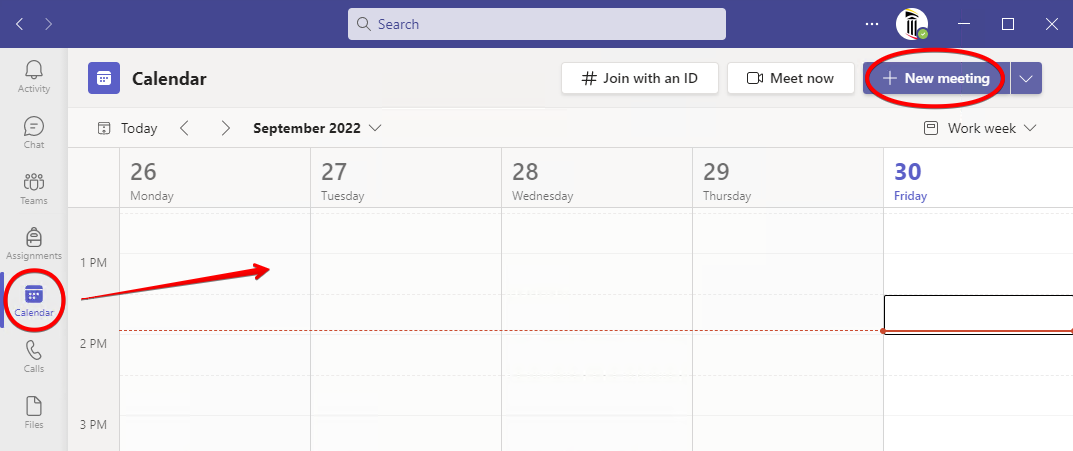
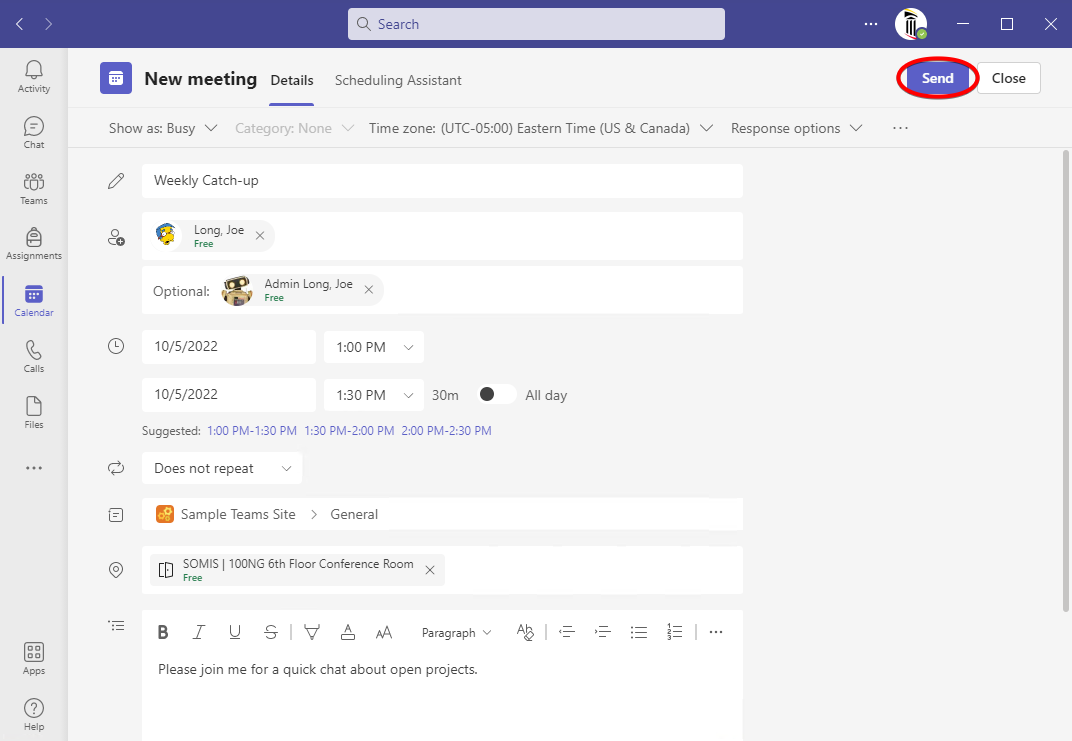
The following fields are mandatory: Title, attendees, time and date.
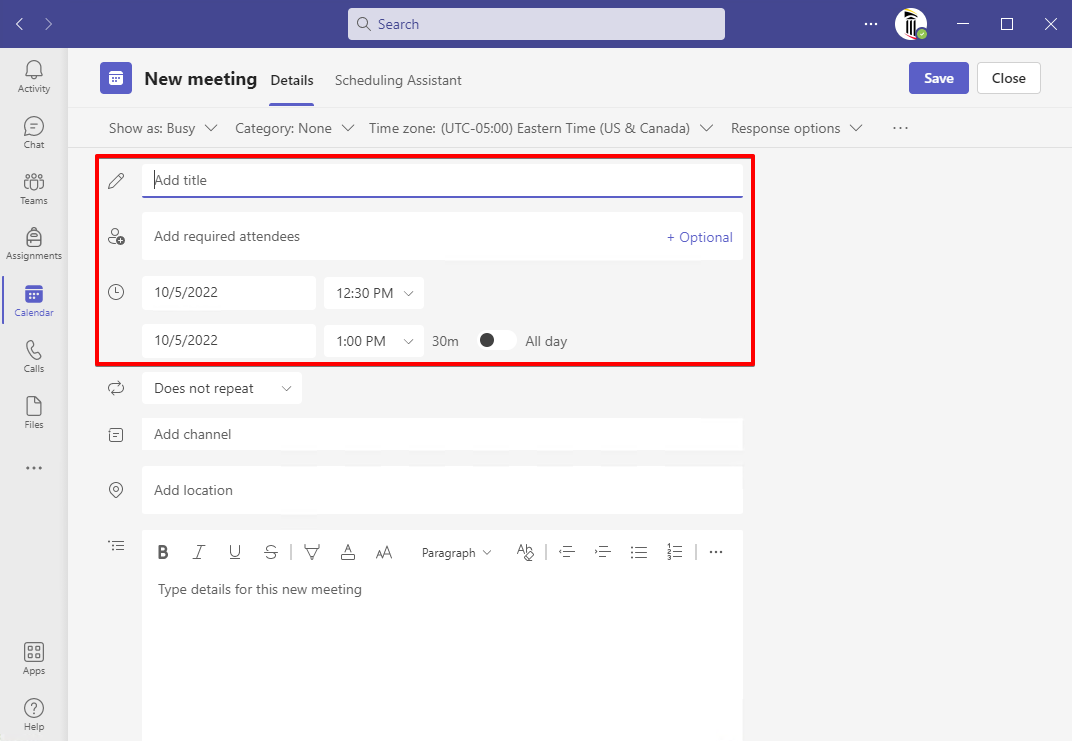
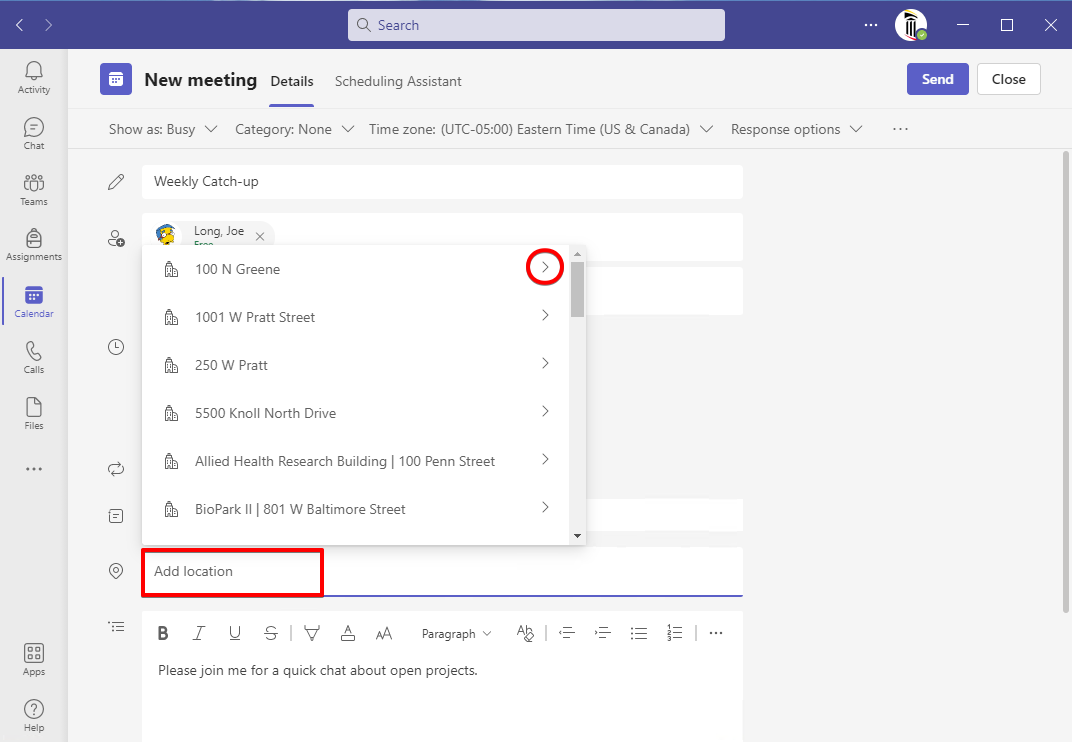
If this is a hybrid meeting and there will be people joining from a conference room, you can add the location. Click in the location box and wait for the directory to display. Find your building and room. This will reserve the conference room, which may or may not need to be approved based on the room and its uses. This is entirely optional.
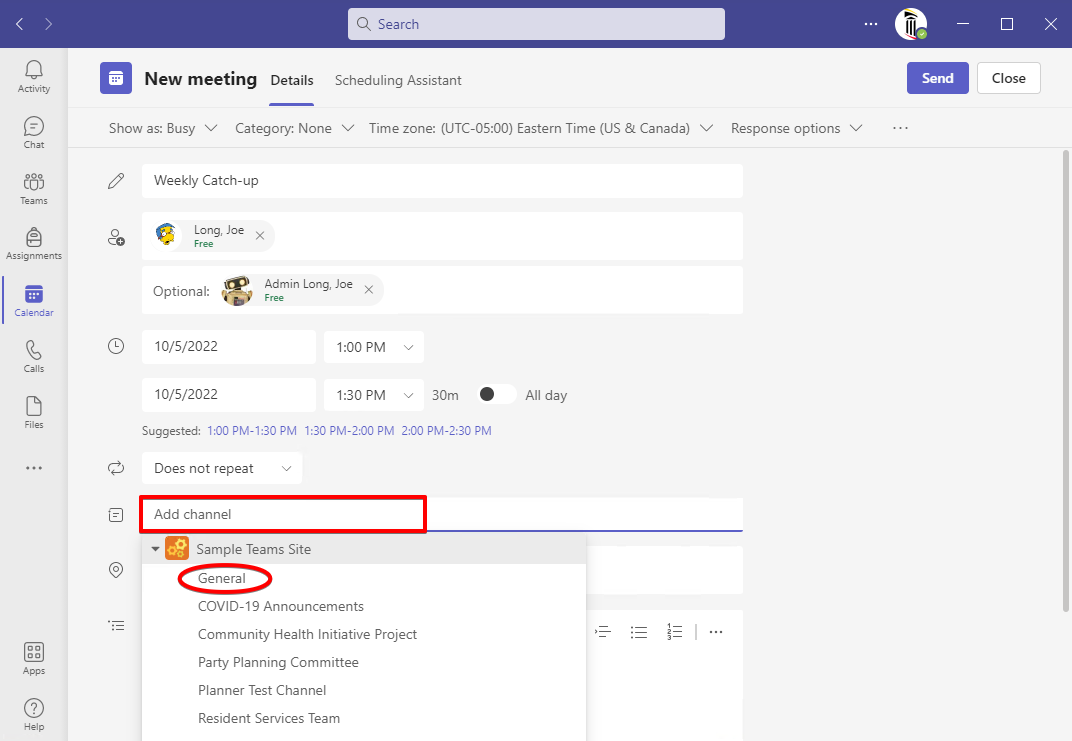
If the target audience of the meeting is the same as the members of a Team or one of its Private Channels, you could consider posting the meeting to that channel. The meeting will display for all members, and any of them will be free to join the meeting, whether or not they were implicitly invited. This is entirely optional.
When you're done, click Send.
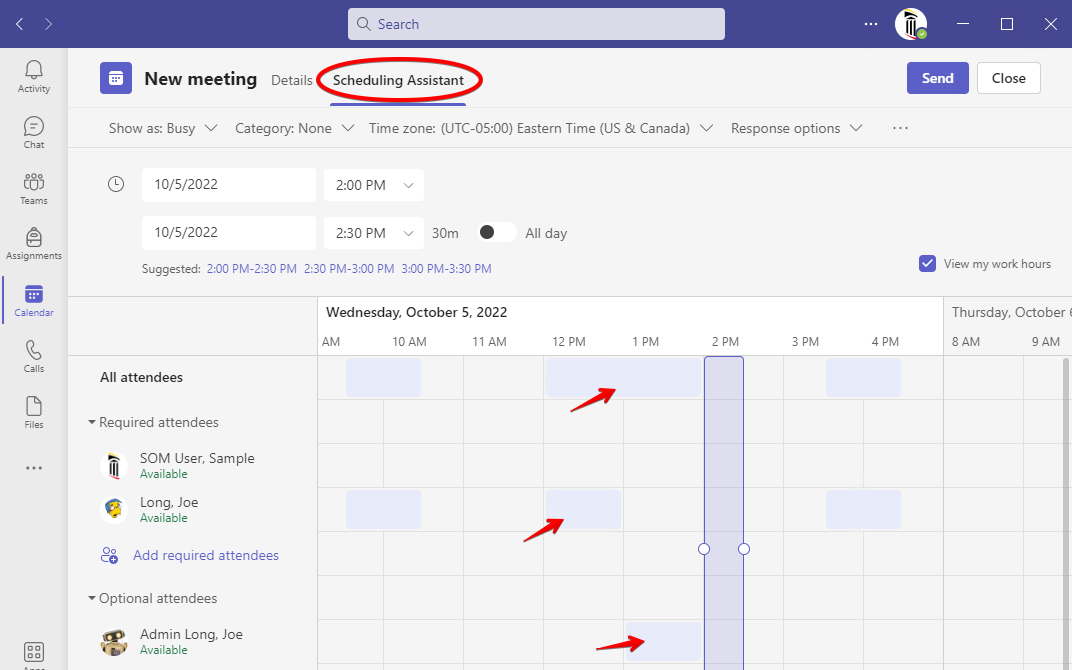
You also have the Scheduling Assistant to assist you. Click on that and see the blocks of time that your attendees are busy, to better gauge when the best time for your meeting would be.
How do I join an existing meeting?
Whether you are the host or participant, join a Teams meeting in the same way. From Teams, find the meeting in your calendar. If the meeting is starting soon, a Join button will display here.
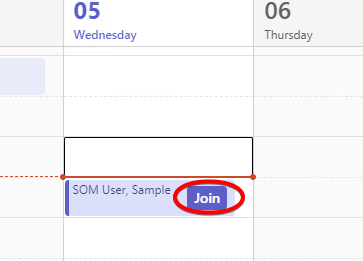
If there is not a Join button, click the meeting once. A Join button will appear beside it.
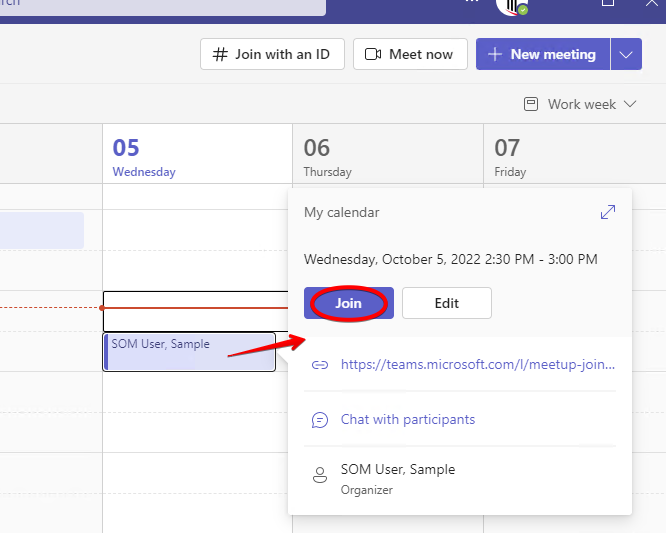
Before joining, you'll be able to toggle your audio and video on or off.

How do I install and use the desktop app?
If you're using a SOM-managed workstation, Teams should already be installed.
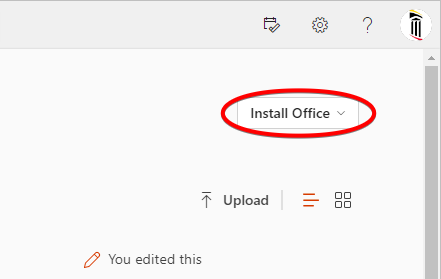
If you're using a personal computer, you can get Teams as part of the full Microsoft 365 Suite. SOM users with a Microsoft 365 license can install Office on up to five computers. Go to https://portal.office.com and click Install Office.
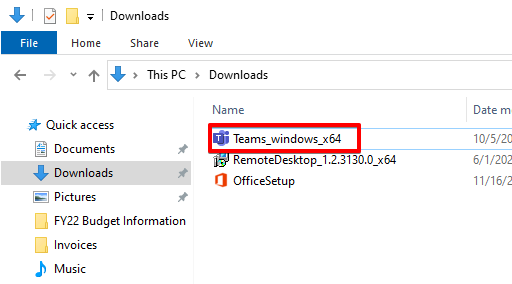
You can also install Teams separately. While using the web version of Teams (https://teams.microsoft.com), click on the ellipses and go to Download the desktop app.
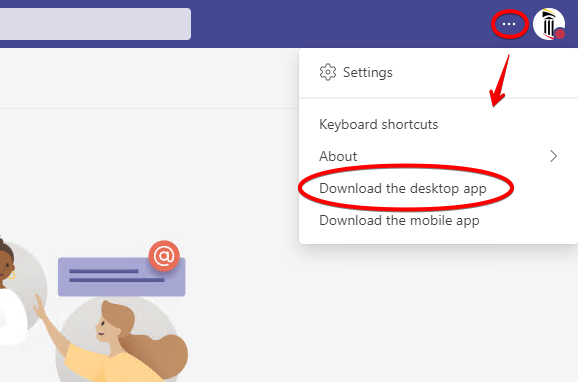
This will place a file called Teams_windows_x64 in your Downloads folder. Double click this file to install Teams. You will not need administrator privileges on your computer to install this.
How do I install and use the Outlook plug-in?
The Teams plug-in for Outlook is installed automatically when Teams is installed. You can find Teams icons in the main calendar ribbon, and on the meeting ribbon.
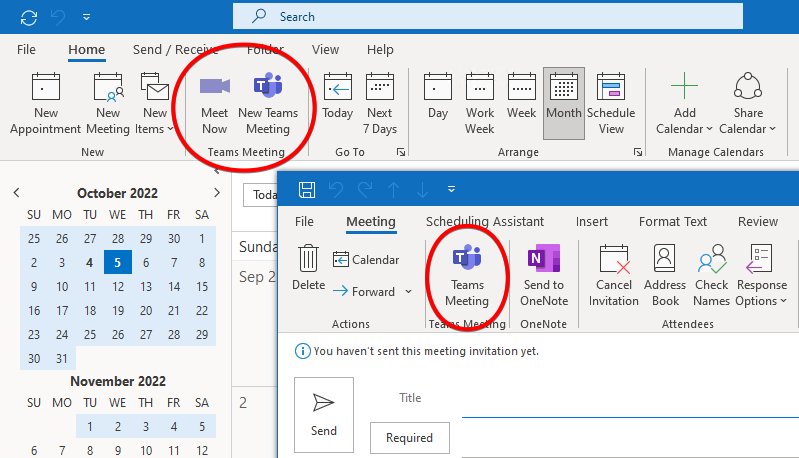
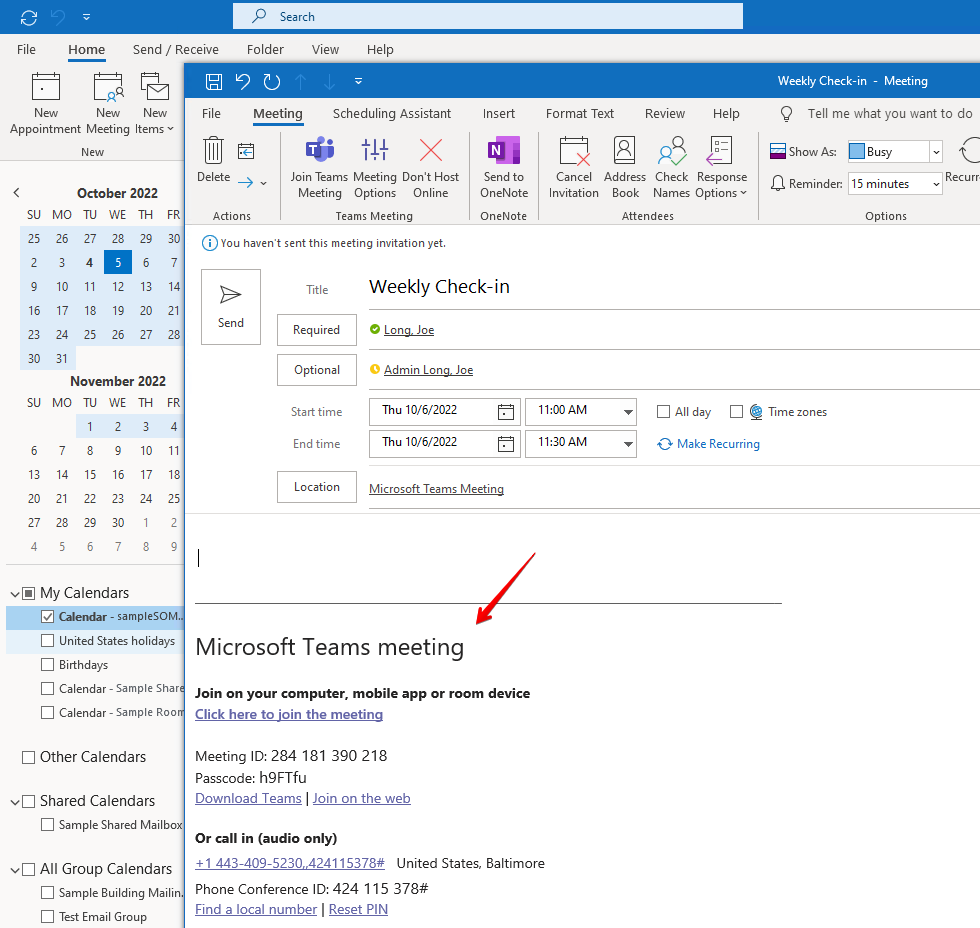
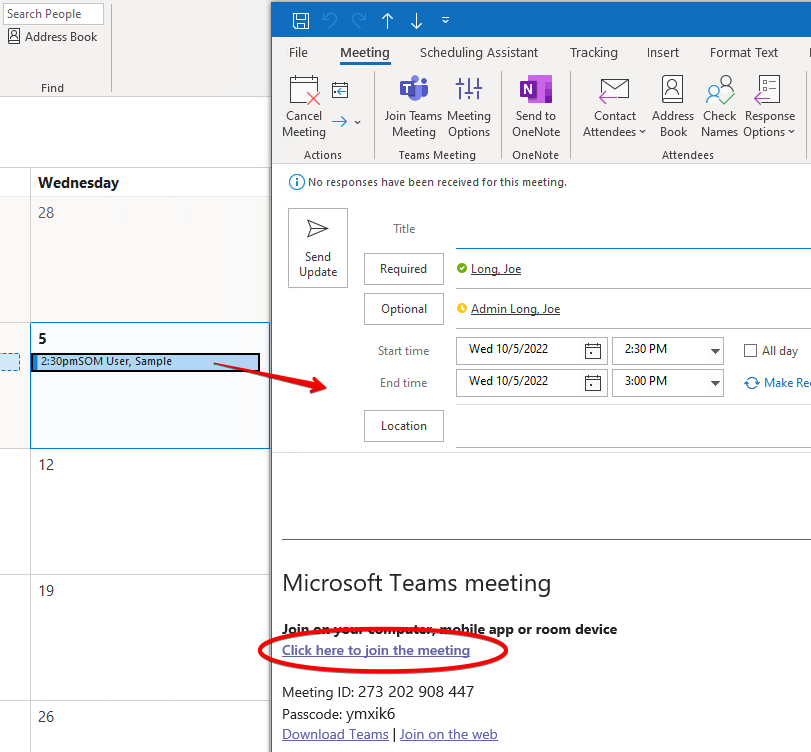
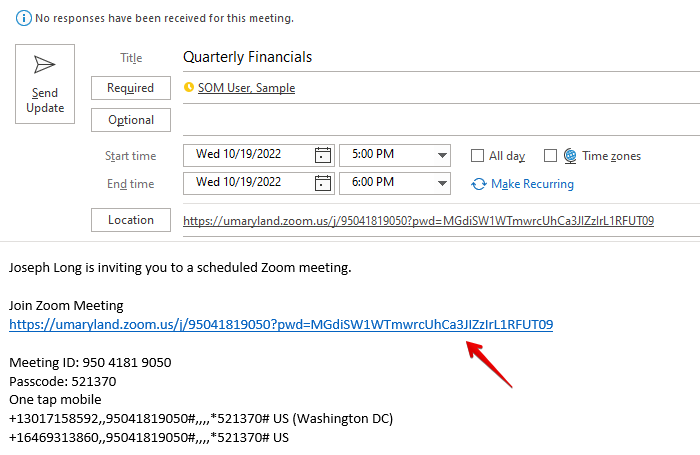
To create a Teams meeting from Outlook, begin creating a meeting as you normally would. Click on Teams Meeting in the ribbon.
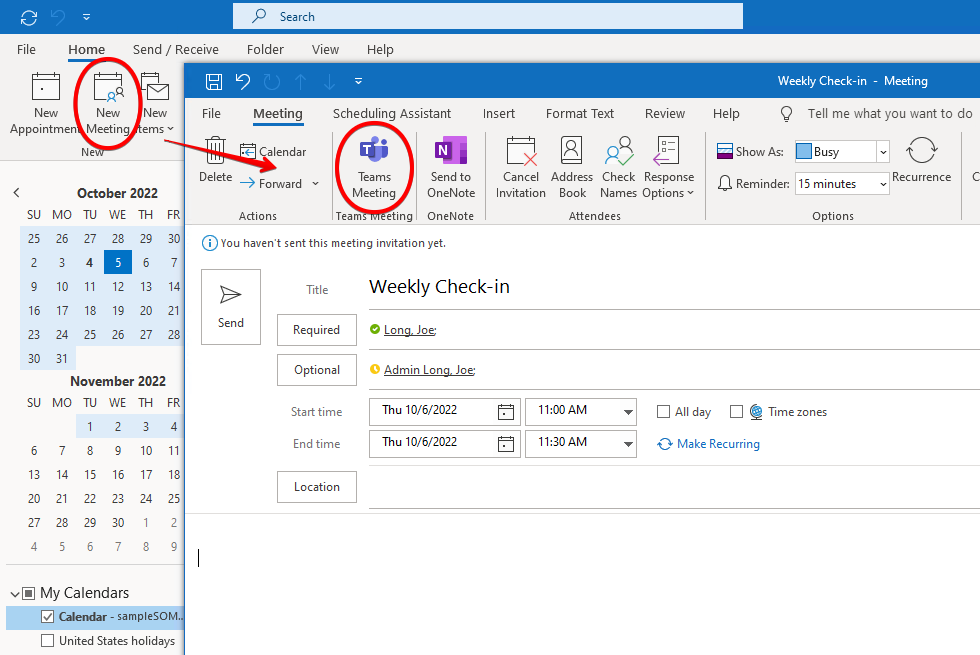
This will populate the body of the meeting with all of the necessary Teams information.
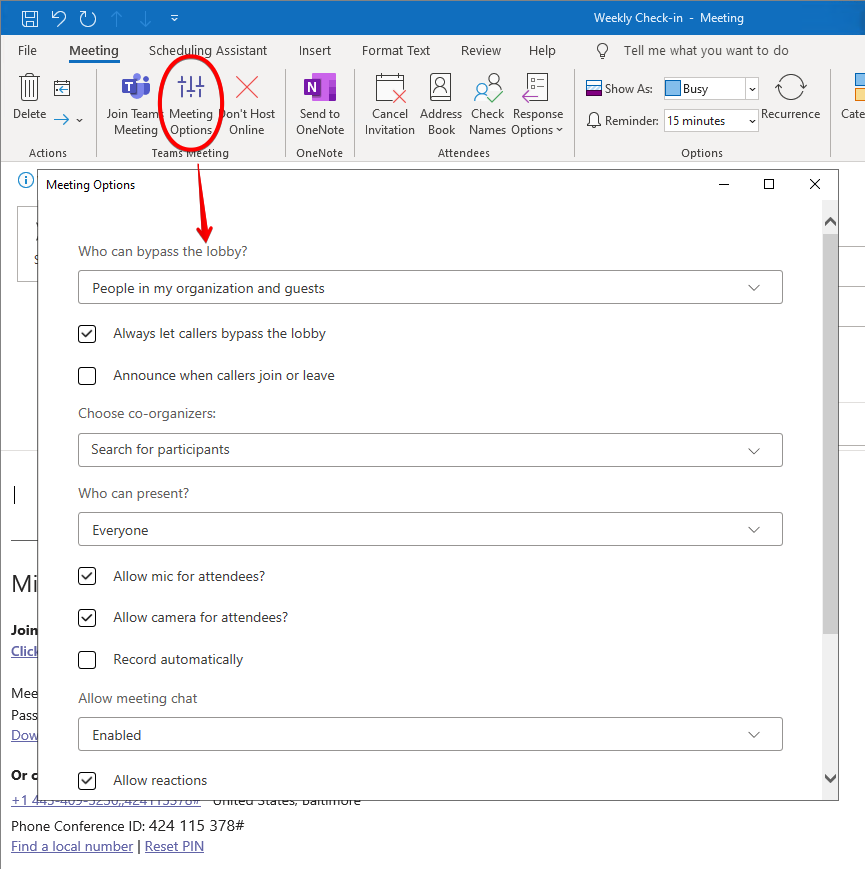
You can click Meeting Options to chance a few things, such as enabling a lobby for users to go into, recording the meeting, or restricting who can present.
To join a meeting from Outlook, open the meeting on your calendar. Click the link in the details.
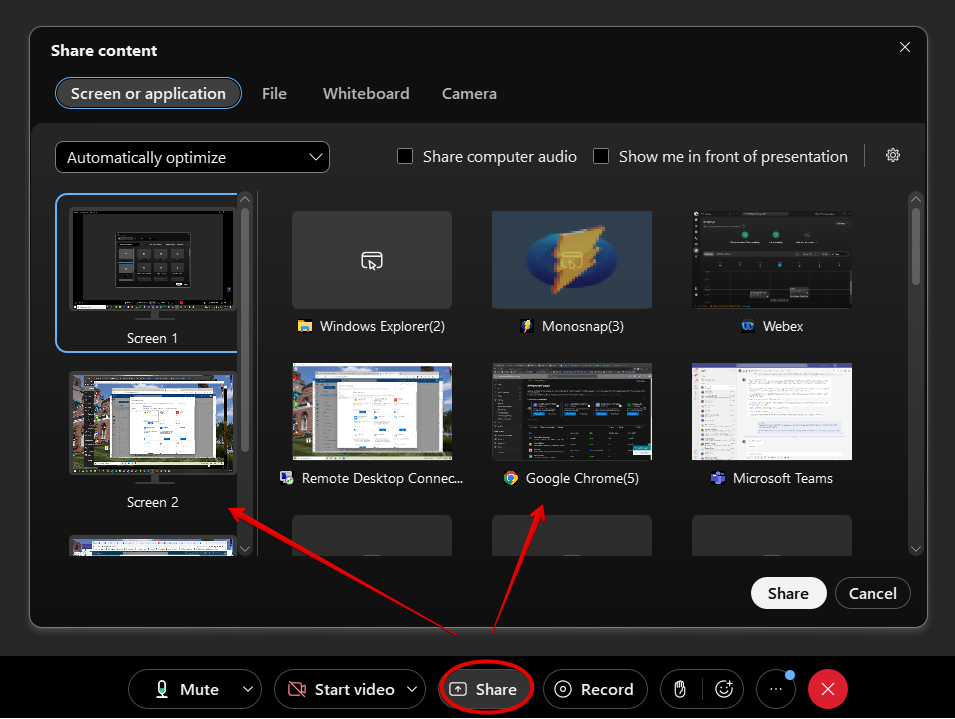
How do I share my screen?
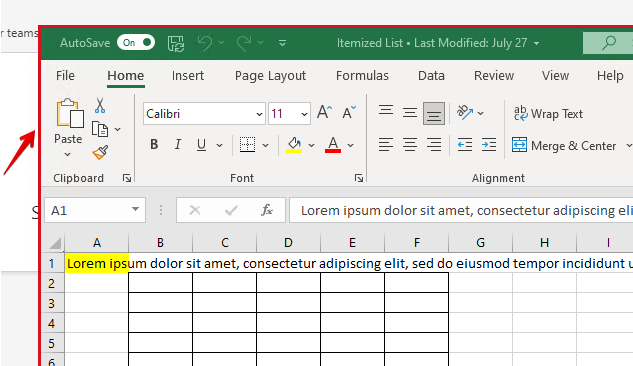
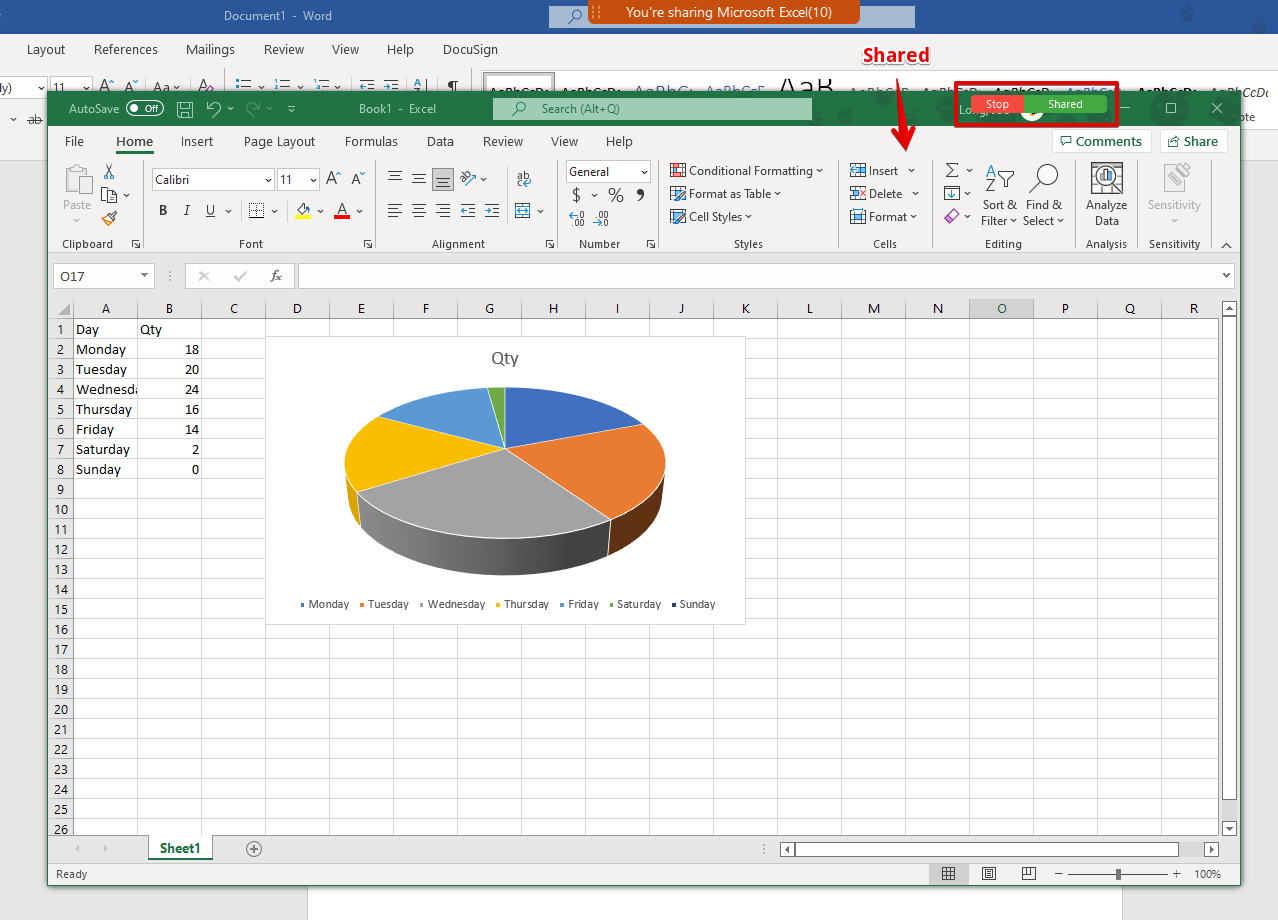
When in a meeting, click on the Share button in the upper right hand corner. You'll have the option to share your entire screen (including your taskbar and desktop background) or just a window (i.e. Excel or Edge). Sharing your screen will display any pop-up notifications such as Outlook during the screen sharing process.
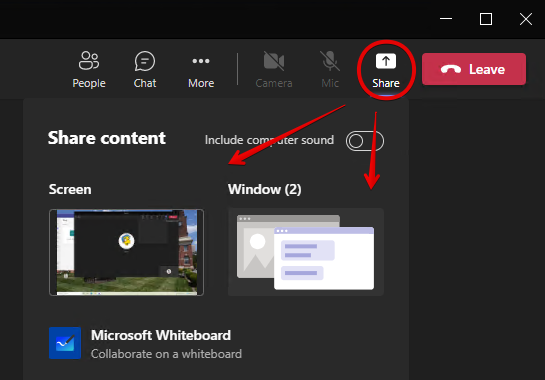
If you have multiple screens (monitors) attached to your computer, you'll have to select which one you want to share.
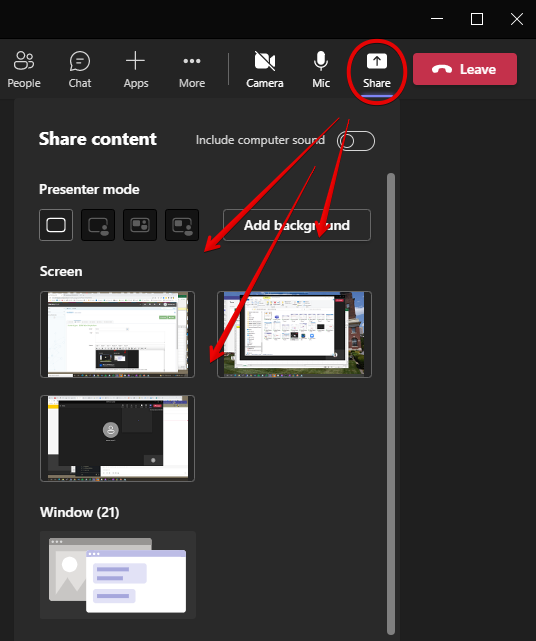
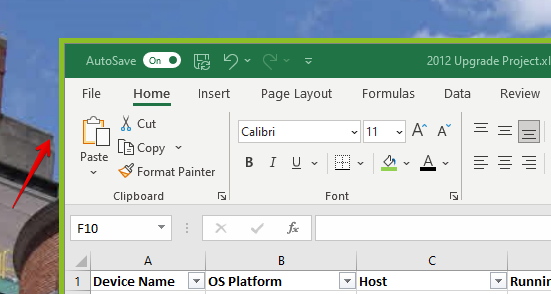
You'll know you are successfully sharing when you see a red box outlining either your entire screen, or a windows, depending on which you've chosen. Here is a red box around Excel.
You can let others control your screen by clicking Give Control on the windowshade (the black bar at the top of the screen) and then selecting their name. You can revoke control at any time.
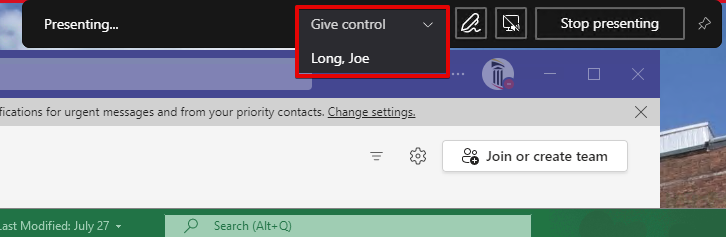
Click Stop presenting on the windowshade when you are finished.
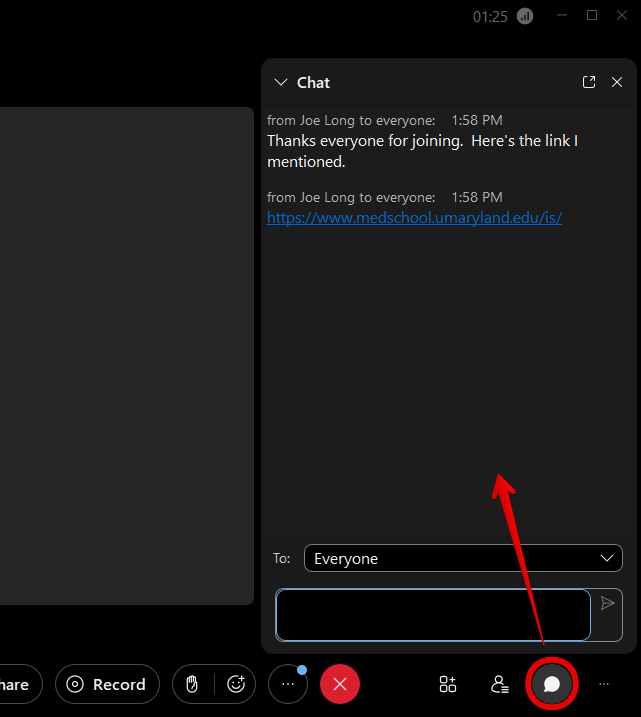
How do I access the chat?
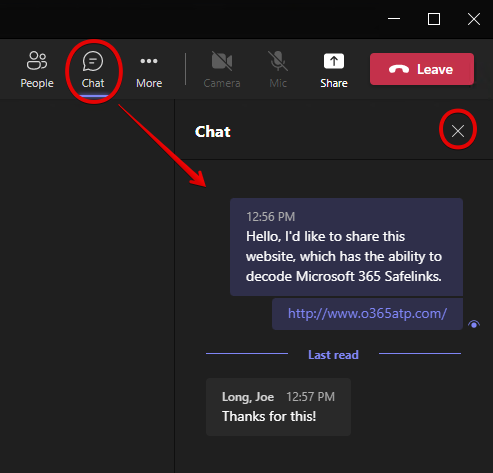
Each meeting will have a chat log, though it is not displayed by default. This can be helpful if you want to ask a question without interrupting the speaker, or share a link or a document to everyone. Click the Chat button in the top menu to display it. Click it again, or click the X, to close the chat. A meeting's chat log will be available in your chat history even once the meeting is over.
Zoom
What is Zoom?
Zoom is an audio/video conferencing tool provided by UMB. This walkthrough will go over the primary functions of Zoom. For more information, and for UMB's policies and additional information, visit their page here: https://www.umaryland.edu/cits/services/zoom/.
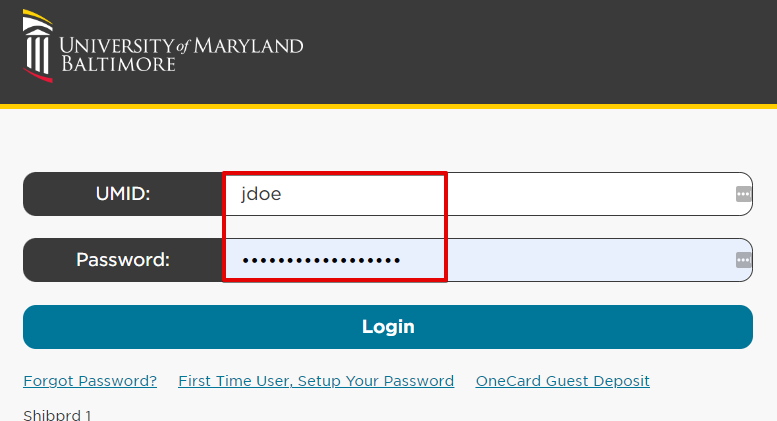
How do I login to Zoom?
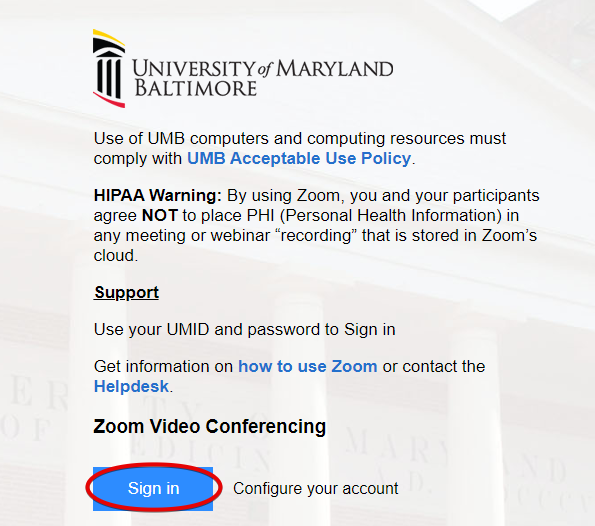
Zoom can be accessed at https://umaryland.zoom.us/.
Click Sign in. You'll be directed to UMB's login page.
Enter your UMID/SOM login information here.
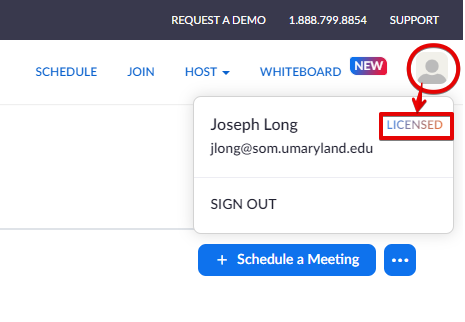
Your account is created the first time you login to Zoom. If you are an active staff or faculty member of UMB, you should be licensed. You may not be automatically licensed if your UMID was created through a Community System sponsorship. To check your license status, click the "person" icon in the upper right-hand corner and note if it says Licensed or Basic here. The primary drawback of a Basic account is that meetings are limited to 40 minutes. If you have a Basic Zoom account, please email the SOM Helpdesk.
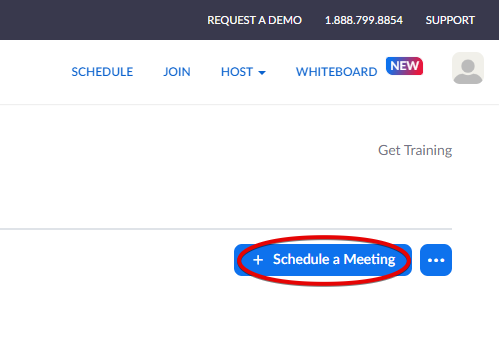
How do I create a meeting in Zoom?
Click Schedule a Meeting.
The following fields are mandatory: Title & time. It is strongly advised to not disable either the passcode or waiting room. Due to a phenomenon called Zoombombing, Zoom calls should always have as much security as possible.
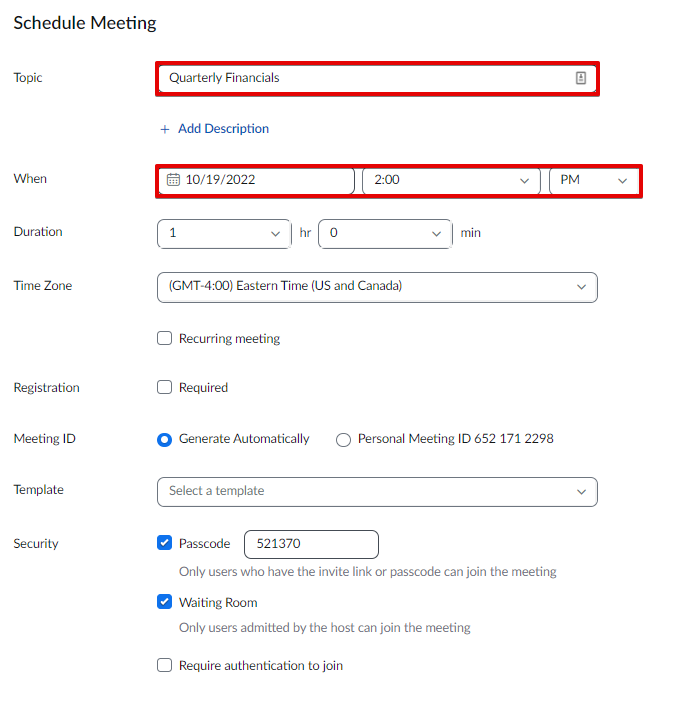
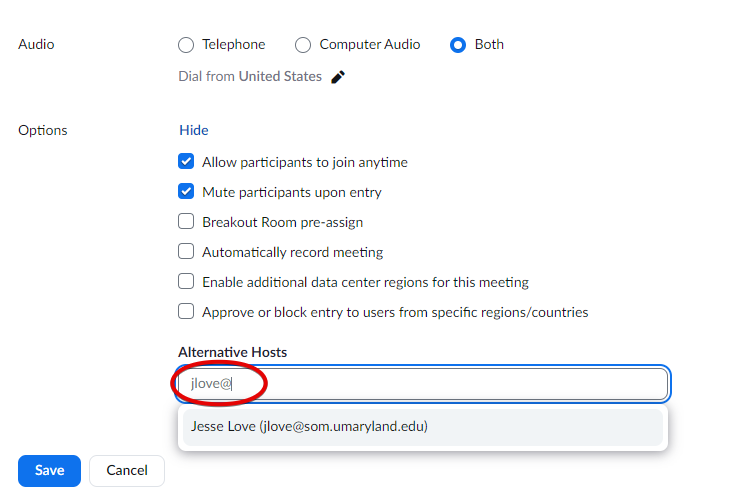
To add a co-host, scroll down to Options and click Show. Begin typing a user's email address into the Alternative Hosts field. The co-host must already have a Zoom account with UMB. You cannot add a co-host who has a privately-managed Zoom account, or a Zoom account with another organization. Those people may join your Zoom meeting, but only members of UMB's Zoom environment may be co-hosts.
Click Save to create the meeting.
This will create the meeting and generate an Invite Link. We could now share that invite link with whoever will be attending the meeting - through an email, a Teams post, or some other method. This will not, however, add this meeting to your Outlook calendar. It is important to remember that Zoom and Outlook have no direct awareness of each other. If we want this meeting to appear in our Outlook calendar, we've got to perform a few additional steps.
Click the button labeled Outlook Calendar (.ics). This will download a small file onto your computer.
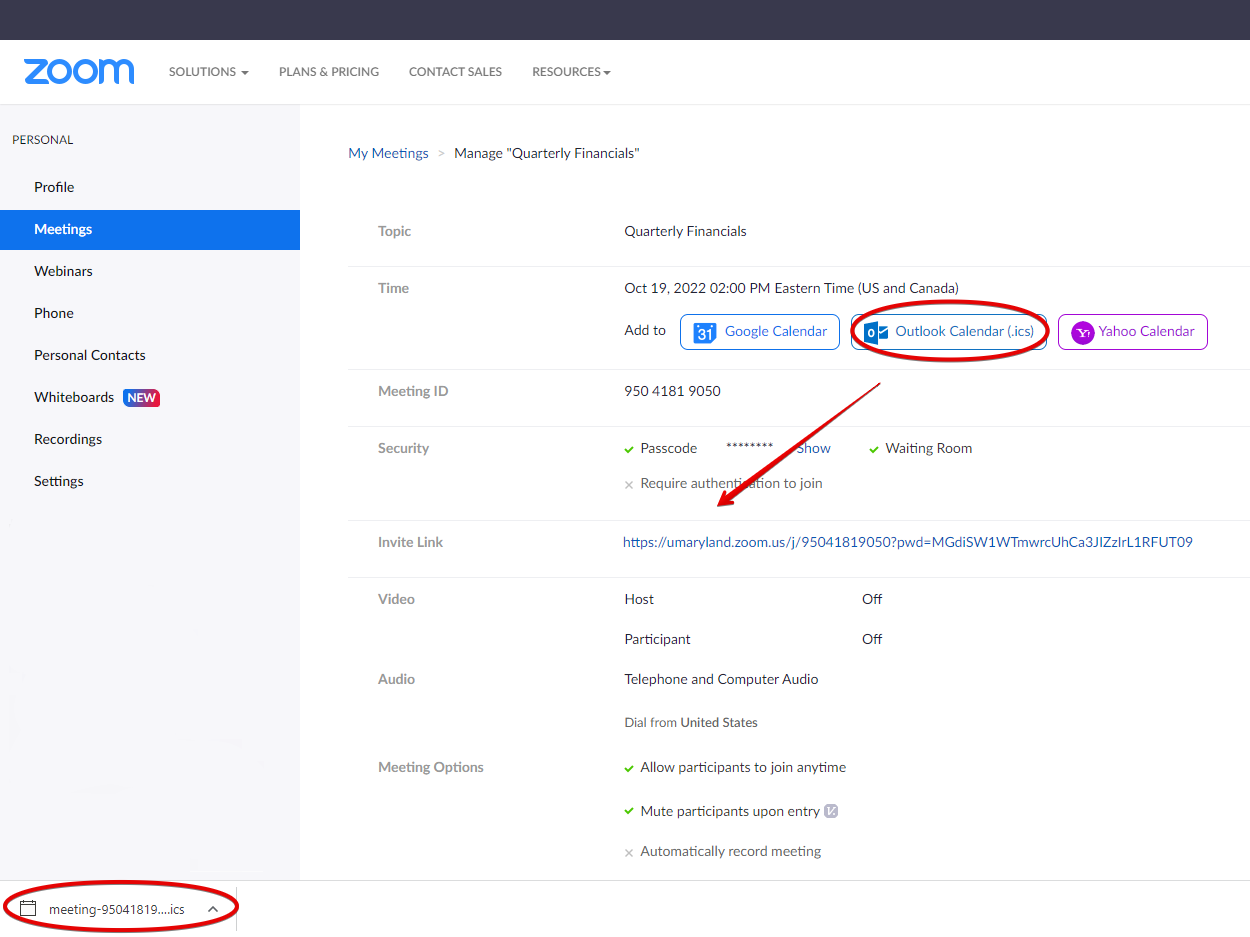
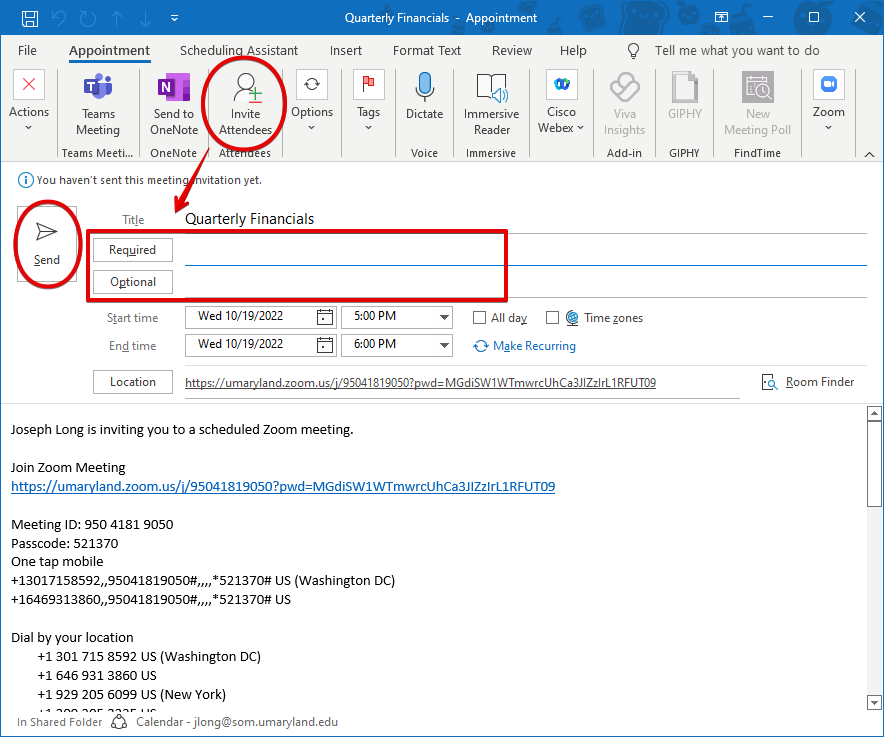
Open this file, which will launch it as a new Appointment in Outlook. Now click Invite Attendees at the top. This will open up the Required and Optional fields. Add the attendees, verify that the time and date are correct, and click Send.
How do I join an existing meeting?
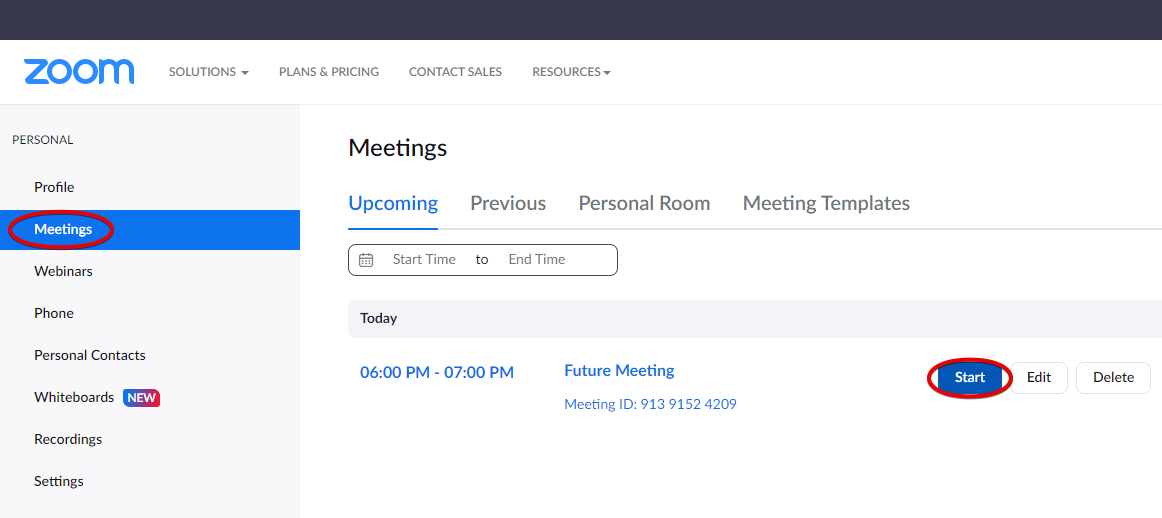
Go to Zoom (https://umaryland.zoom.us) > Meetings > Hover over the meeting and click Start.
You could also open the Outlook event and click the Invite URL.
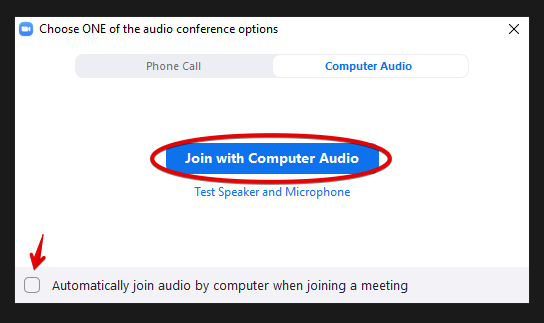
Click Join with Computer Audio. You can alternatively call into the meeting with a telephone. You can also select to join with computer audio automatically each time by selecting this checkbox.
You will join with your audio on and your camera off, unless the host of the meeting had changed the default options.
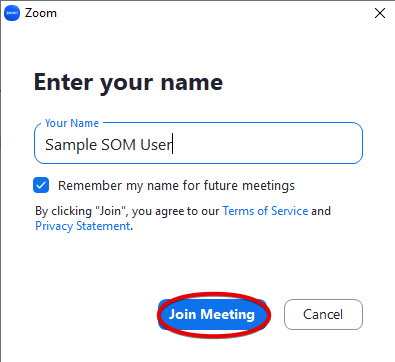
Guests—those who join your Zoom call without an account—will be prompted to enter their name before joining.
How do I install and use the desktop app?
The Zoom Desktop Client will automatically download and install the first time you connect to a Zoom call. However, you can also manually download it.
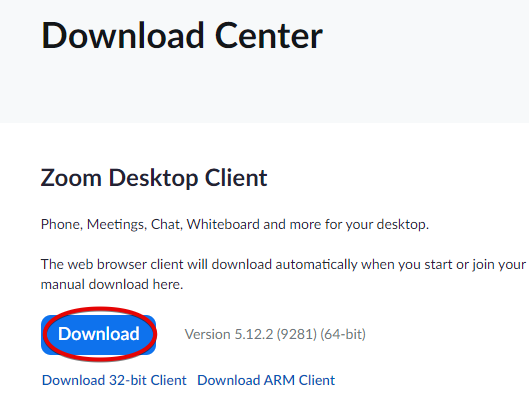
Go to https://umaryland.zoom.us. Go to Resources > Download Center.
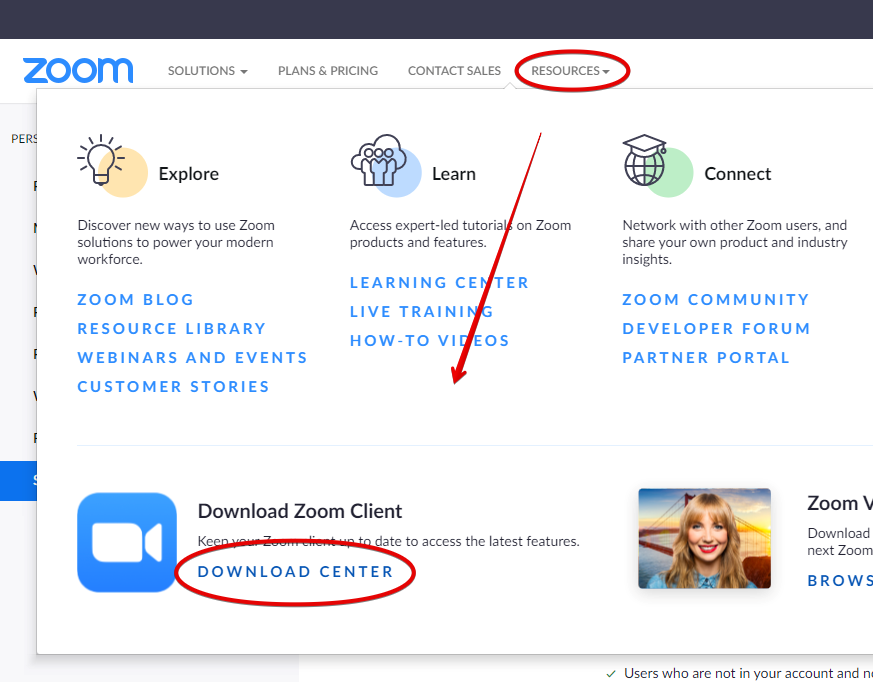
Click Download under the Zoom Desktop Client. Run the file once it's downloaded. It does not need administrator privileges.
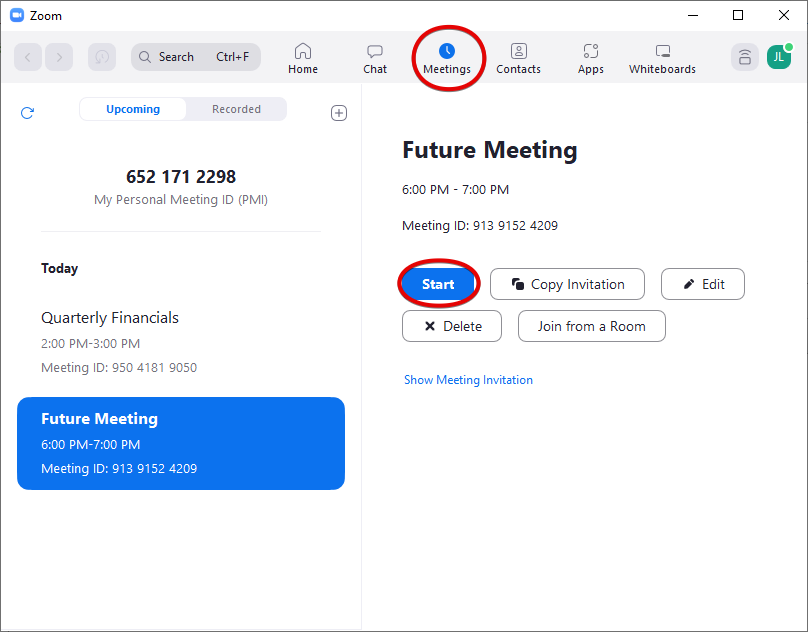
Launch the app. Your next scheduled meeting will appear on the home page. To join that meeting, simply click Start.

You can also click on Meetings along the top. This will list all upcoming meetings. To join one of these, select the meeting and click Start.
Back at the home screen, you can click Schedule to create a new Zoom event.
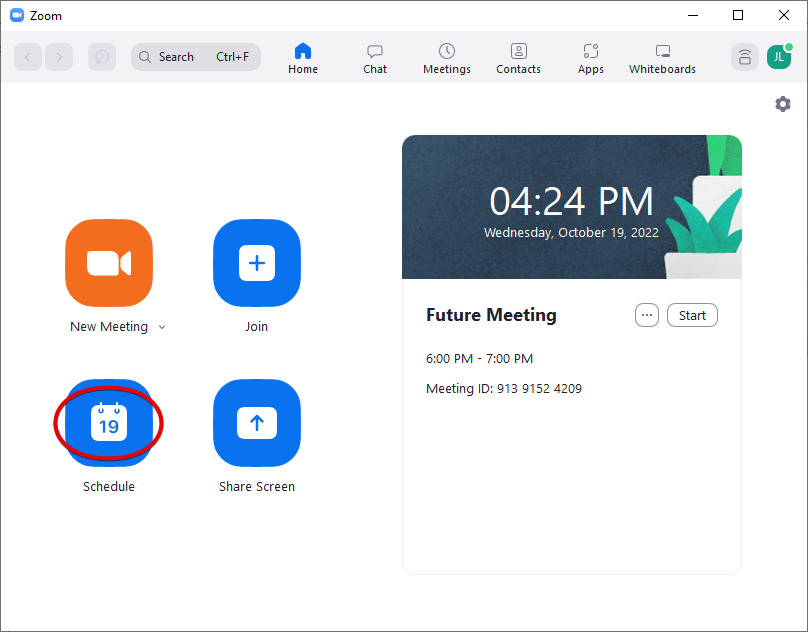
This will launch a window with meeting options. The meeting name and time are required fields. Be sure that Outlook is selected under Calendar. Click Save when done.
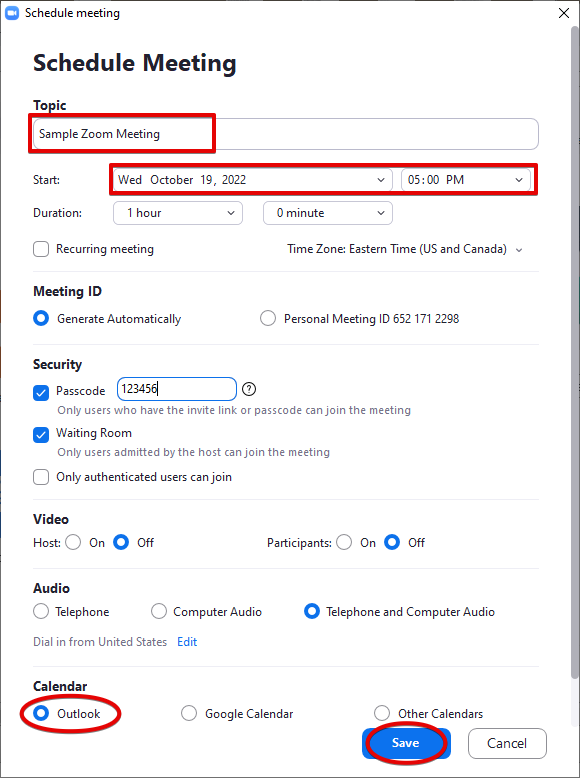
Once you click Save, the event will open in Outlook, so that you can invite other attendees.
How do I install and use the Outlook plug-in?
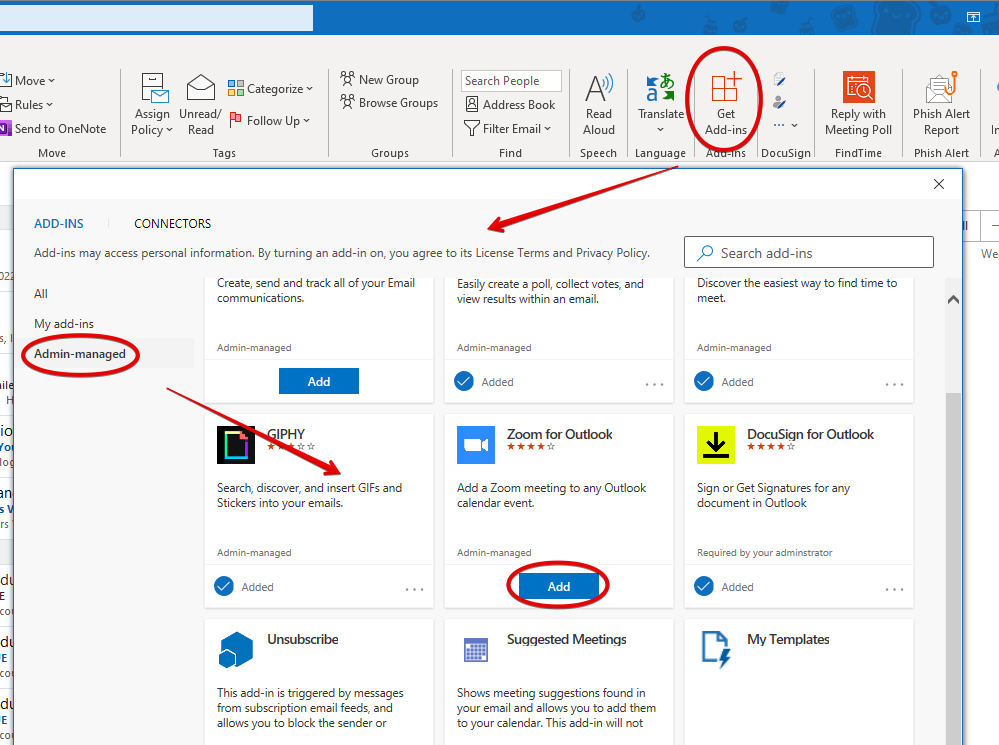
To install the Zoom plug-in for Outlook, go to Get Add-ins > Admin-managed > Zoom for Outlook > Add. The privacy policy will display and you'll click Continue.
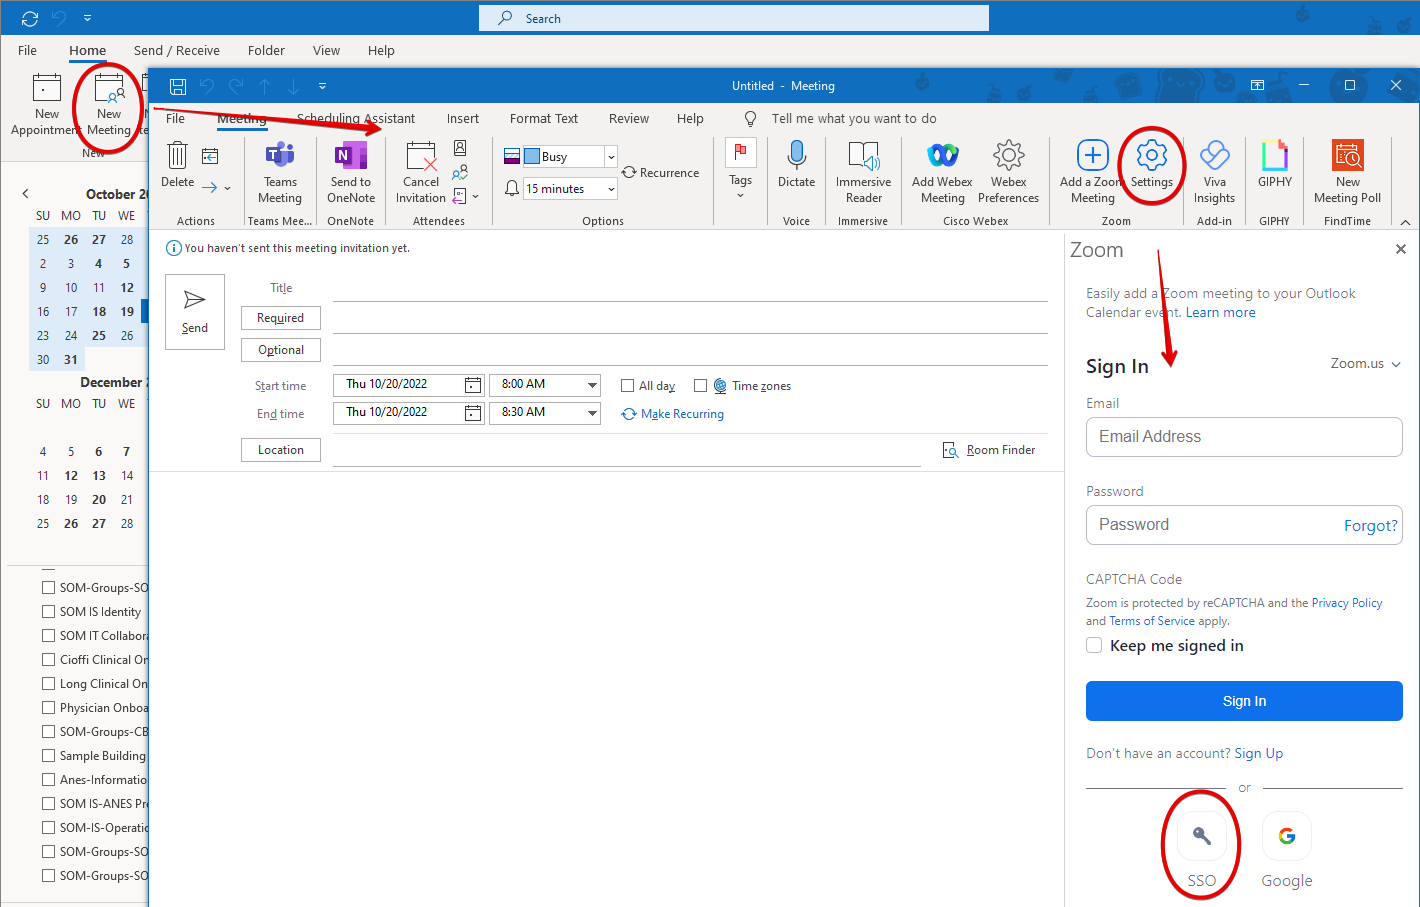
The Zoom plug-in will only display while creating a new meeting. Here's how to log in for the first time. Create a new meeting, go to Settings > SSO (single sign-on).
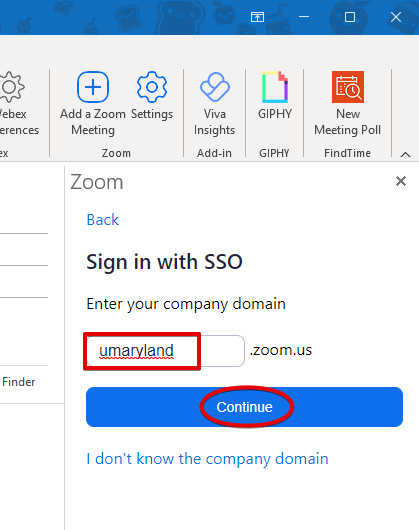
Type umaryland into the domain field, and Continue.
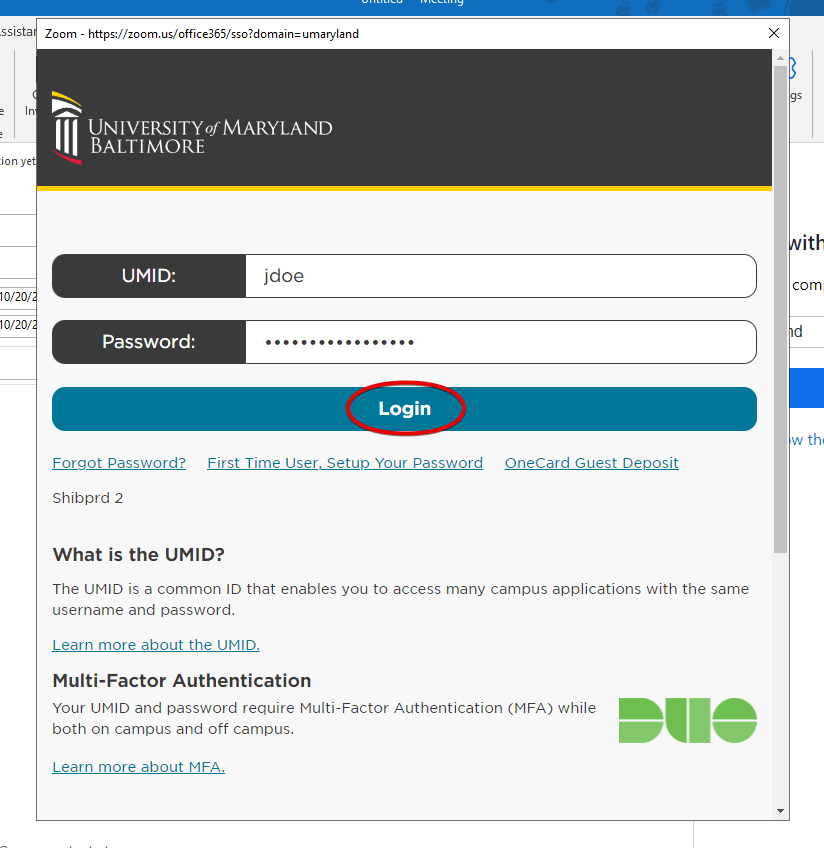
This will redirect you to login with your UMID/SOMID. Enter it here and select Login.
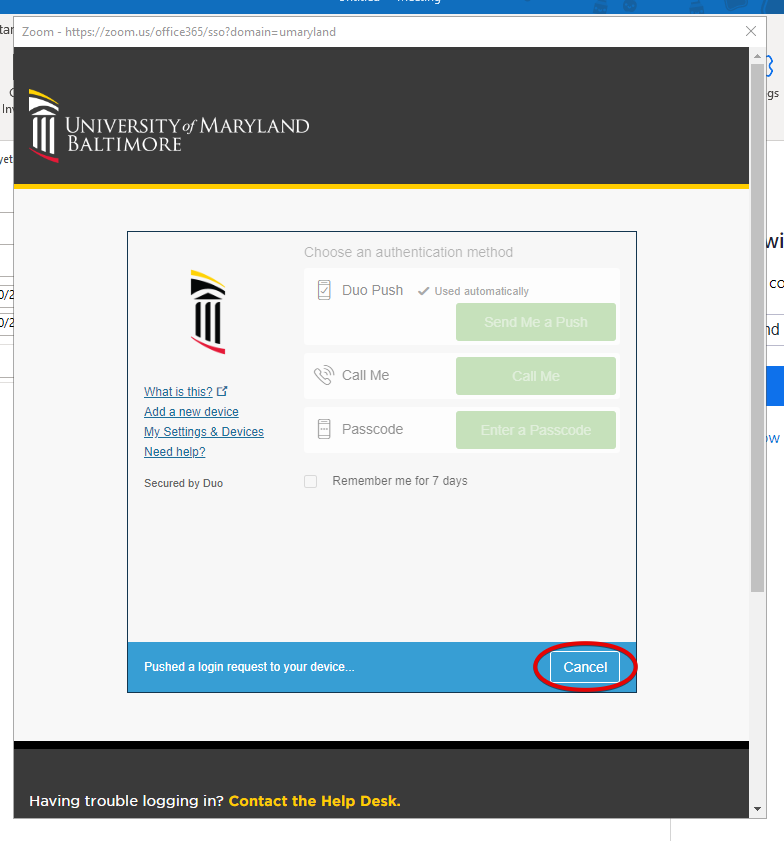
This will push a DUO request to your mobile device. To avoid you having to accept a DUO push each day, we'll cancel this request and check the option to remember you for 7 days. This is optional but strongly recommended.
Click Cancel.
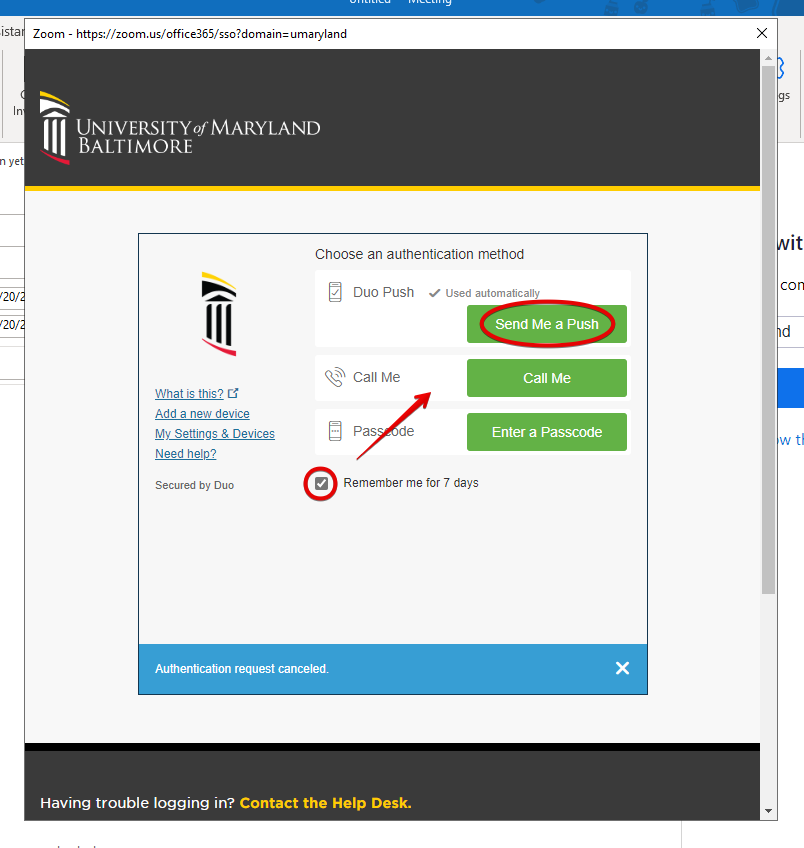
Now check the box for Remember me for 7 days, then Send Me a Push. Afterward, the Zoom plug-in will be ready to use.
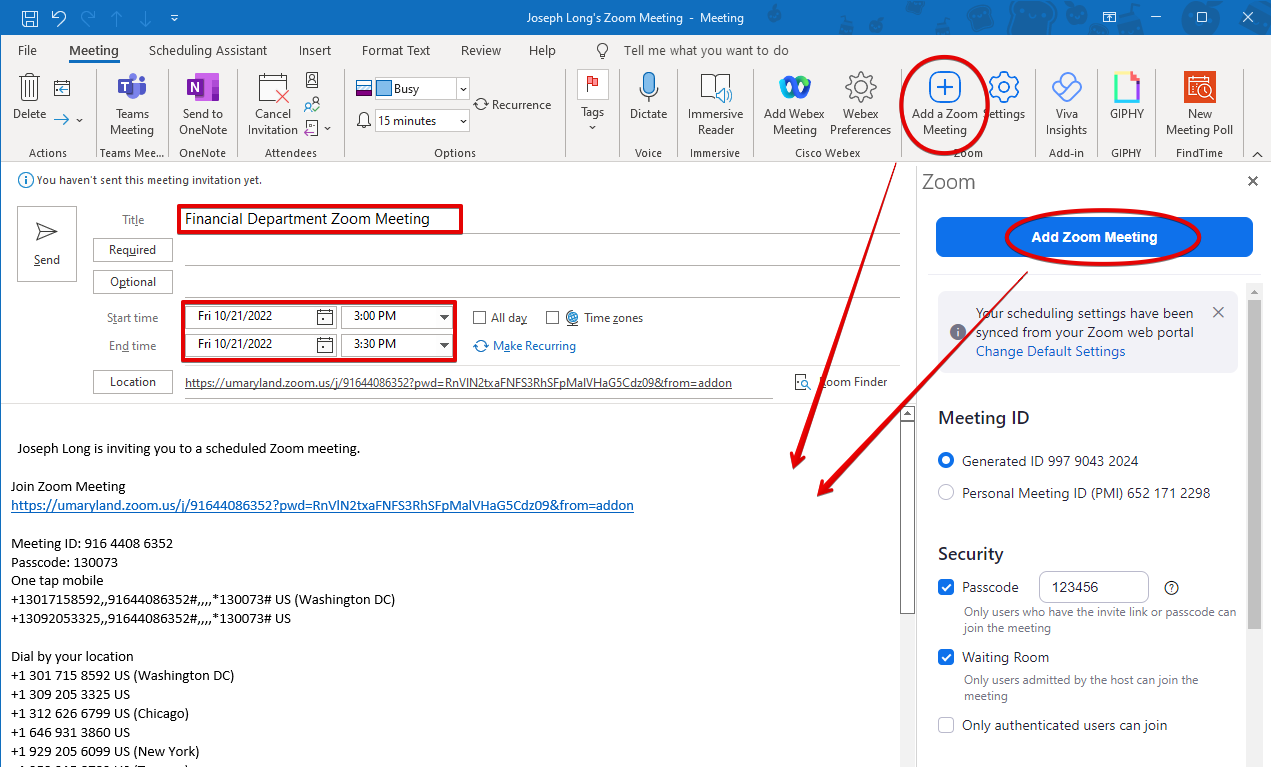
To create a Zoom meeting from Outlook, begin creating a meeting as you normally would. Click on Add a Zoom Meeting in the ribbon, or click on Add Zoom Meeting if you have the Zoom Settings pane open. This will populate all of the necessary information into the meeting. Be sure to set the proper date and time, and invite your desired recipients.
How do I share my screen?
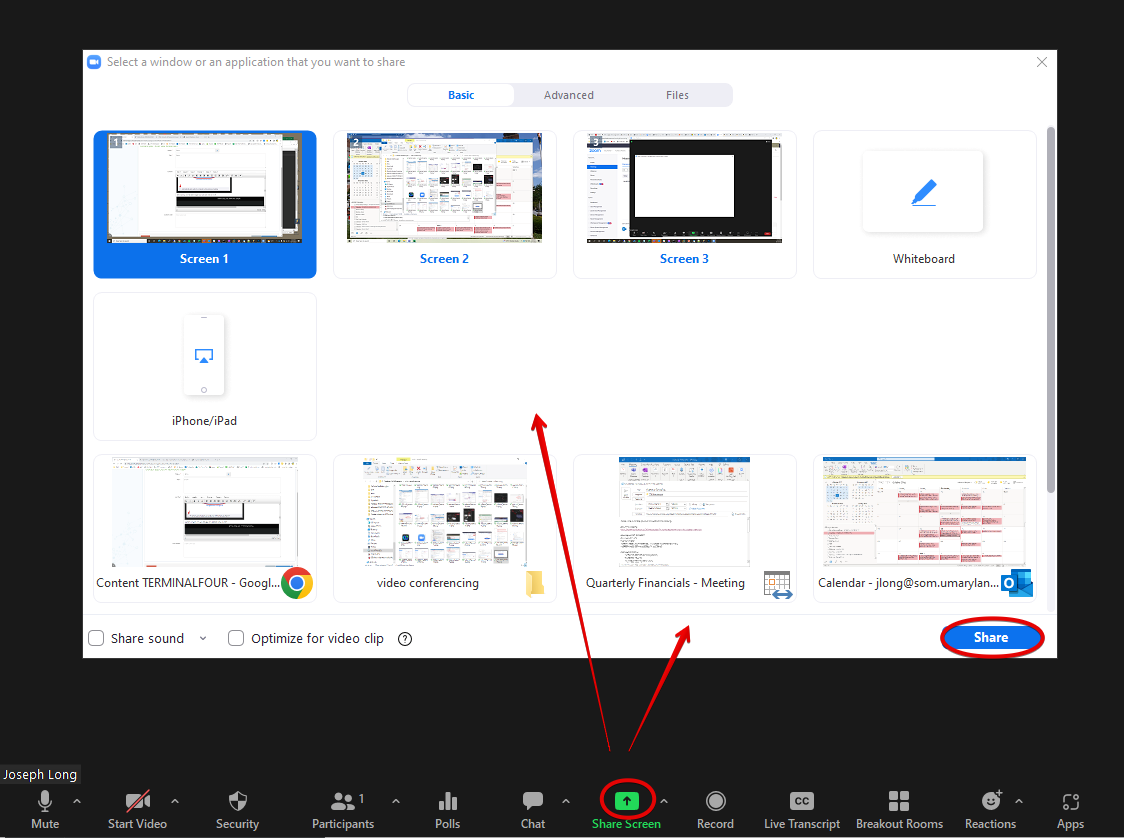
When in a meeting, click on Screen Share at the bottom of the screen. You'll have the option to share your entire screen (including your taskbar and desktop background) or just an application (i.e. Excel or Edge). Sharing your screen will also display any pop-up notifications, such as email notifications or Teams chats, during the screen-sharing process.
You'll know you are successfully sharing when you see a green box outlining either your entire screen, or a window, depending on which you've chosen. Here is a green box around Excel.
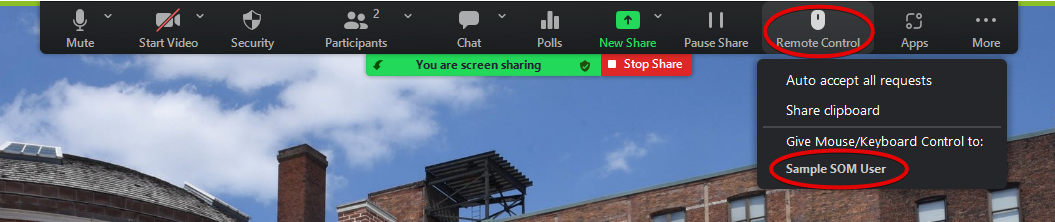
You can let others control your screen by clicking Remote Control on the windowshade (the black bar at the top of the screen - if the windowshade is hidden, move your mouse to the top center of the screen) and then select their name. You can revoke control at any time.
Alternatively, another participant can request control by clicking View Options at the top of their screen and then Request Remote Control. This will display a notification on your screen which you can approve or deny.

Click Stop Share on the windowshade when you are finished.
How do I access the chat?
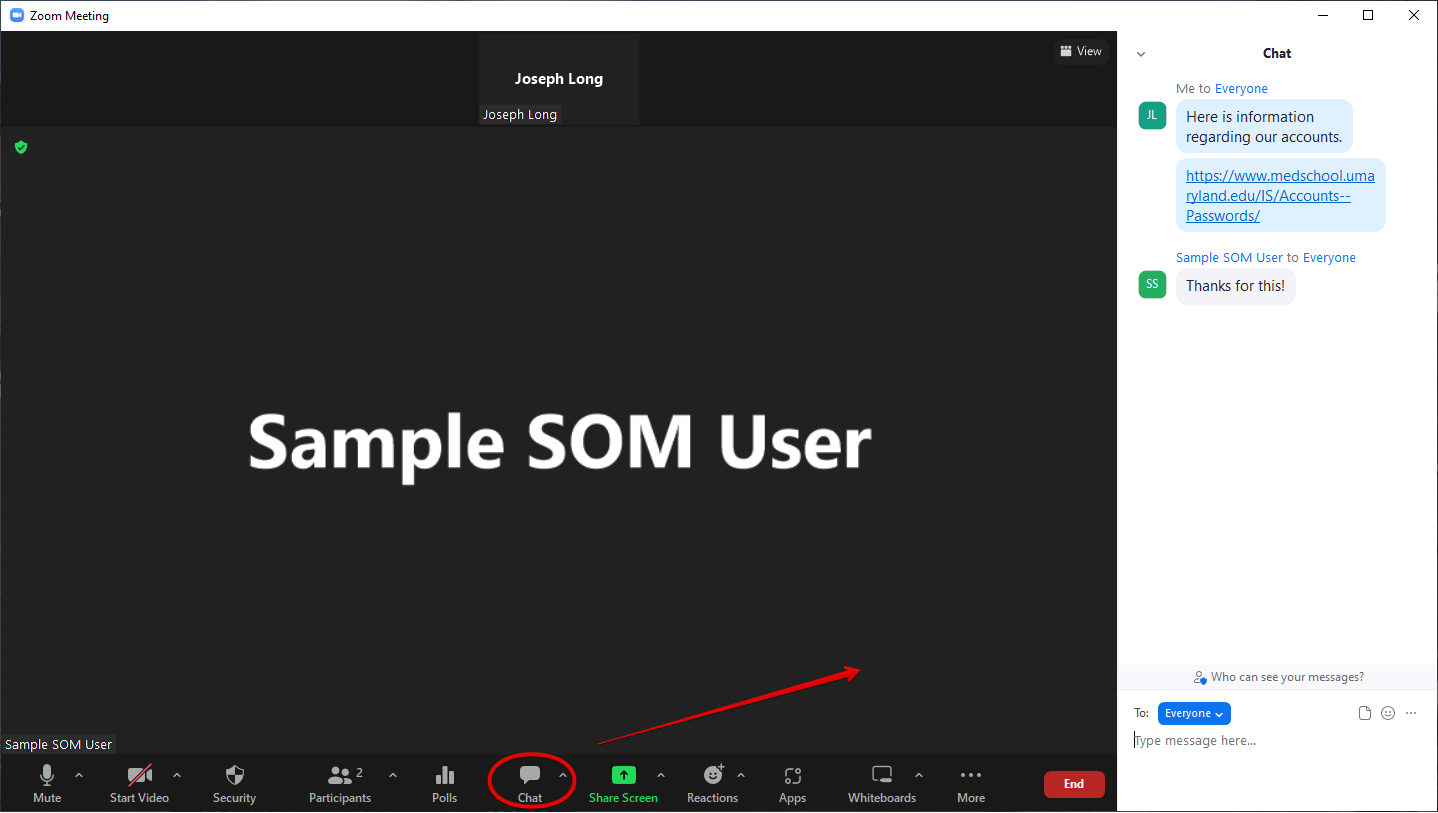
Each meeting will have a chat log, though it is not displayed by default. This can be helpful if you want to ask a question without interrupting the speaker, or share a link or a document to everyone. Click the Chat button in the bottom menu to display it. Click it again to close the chat.
Webex
What is Webex?
Webex is Cisco's audio/video conferencing tool, provided by UMB. This walkthrough will go over the primary functions of Webex. Webex calls are HIPAA compliant. For more information, and for UMB's policies and additional information, visit their page here: https://www.umaryland.edu/cits/services/webex/.
How do I login to Webex?
Webex can be accessed at https://umaryland.webex.com/.
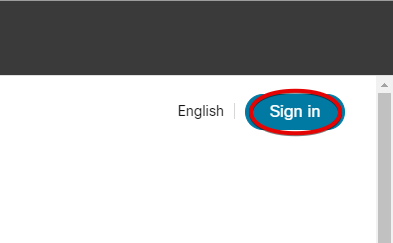
Click Sign in, in the upper right hand corner. You'll be directed to UMB's login page.
Enter your SOM email address here and click Sign In.
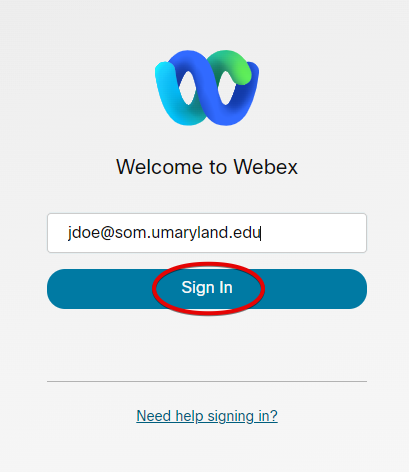
You'll be redirected to UMB's login page. Enter your UMID/SOM login information here and Login.
Your account is created the first time you login to Webex. If you are an active staff or faculty member of UMB, you should be licensed. You may not be automatically licensed if your UMID was created through a Community System sponsorship, or if you are an FPI-leased employee. If you need a Webex license, please email the SOM Helpdesk.
How do I create a meeting in Webex?
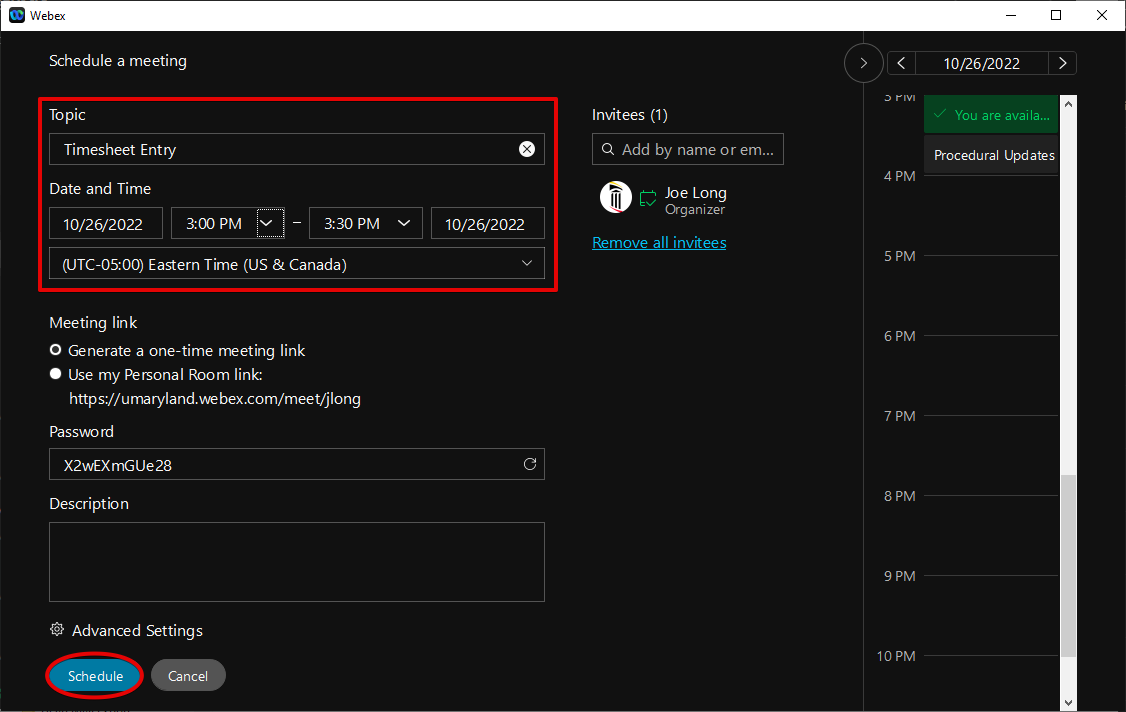
Click Schedule a meeting.
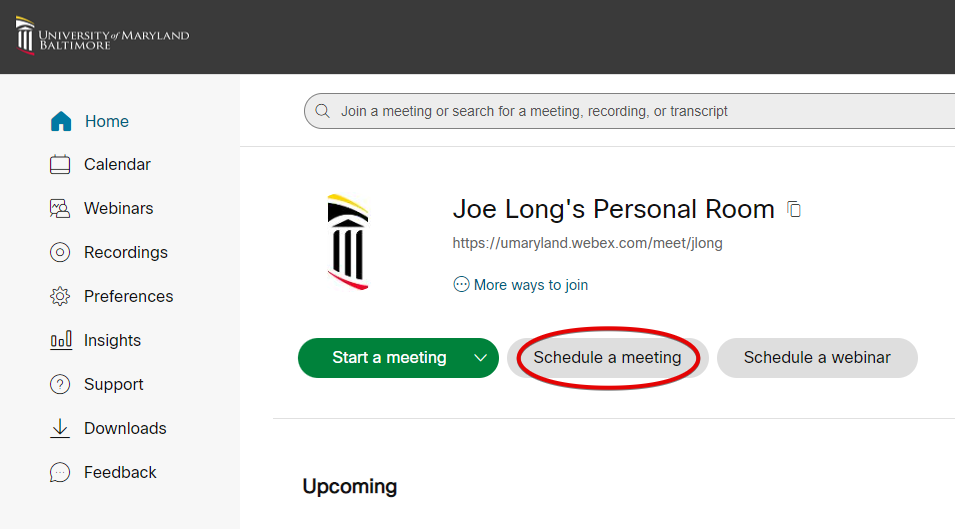
The following fields are mandatory: Meeting topic, Date and time, and Invitees. Click Start when you've finished.

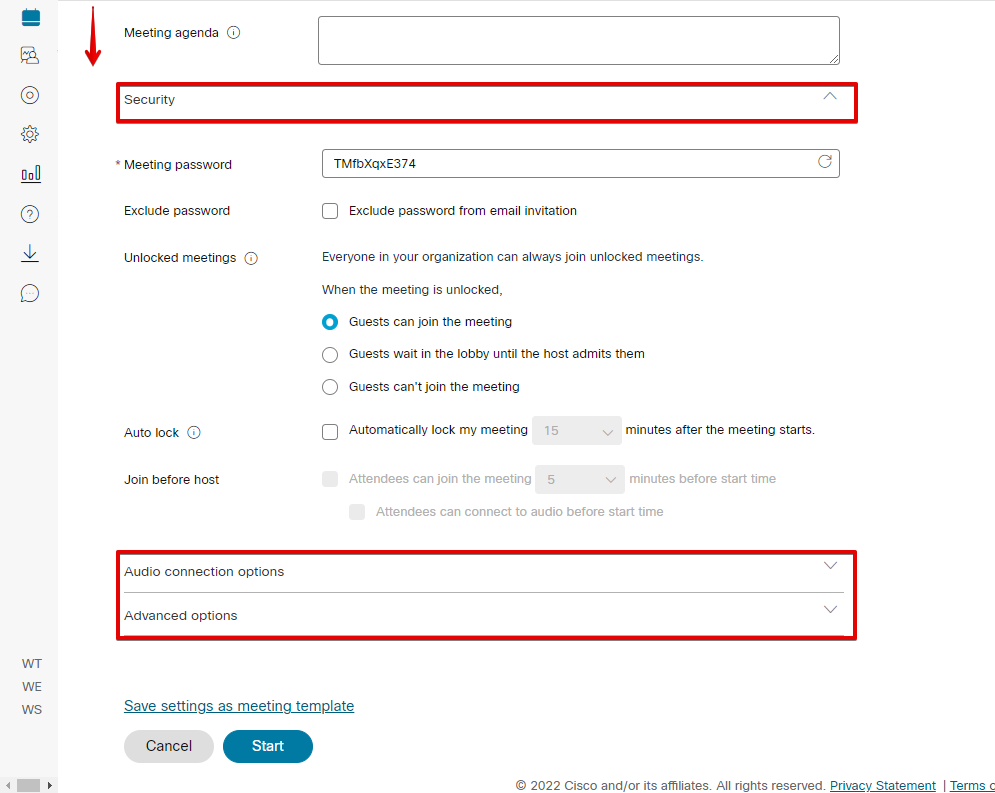
It's also recommended that you expand Security, Audio connection options and Advanced options at the bottom of this page. Familiarize yourself with the different options available to you. For example, you may wish to disable the entry & exit tone, or enforce a waiting lobby for any guests (those without UMB Webex accounts) that may join the meeting.
This will create the meeting and generate an Invite Link. We could now share that invite link with whoever will be attending the meeting - through an email, a Teams post, or some other method. This will not, however, add this meeting to your Outlook calendar. It is important to remember that Webex and Outlook have no direct awareness of each other. If we want this meeting to appear in our Outlook calendar, we've got to perform a few additional steps.
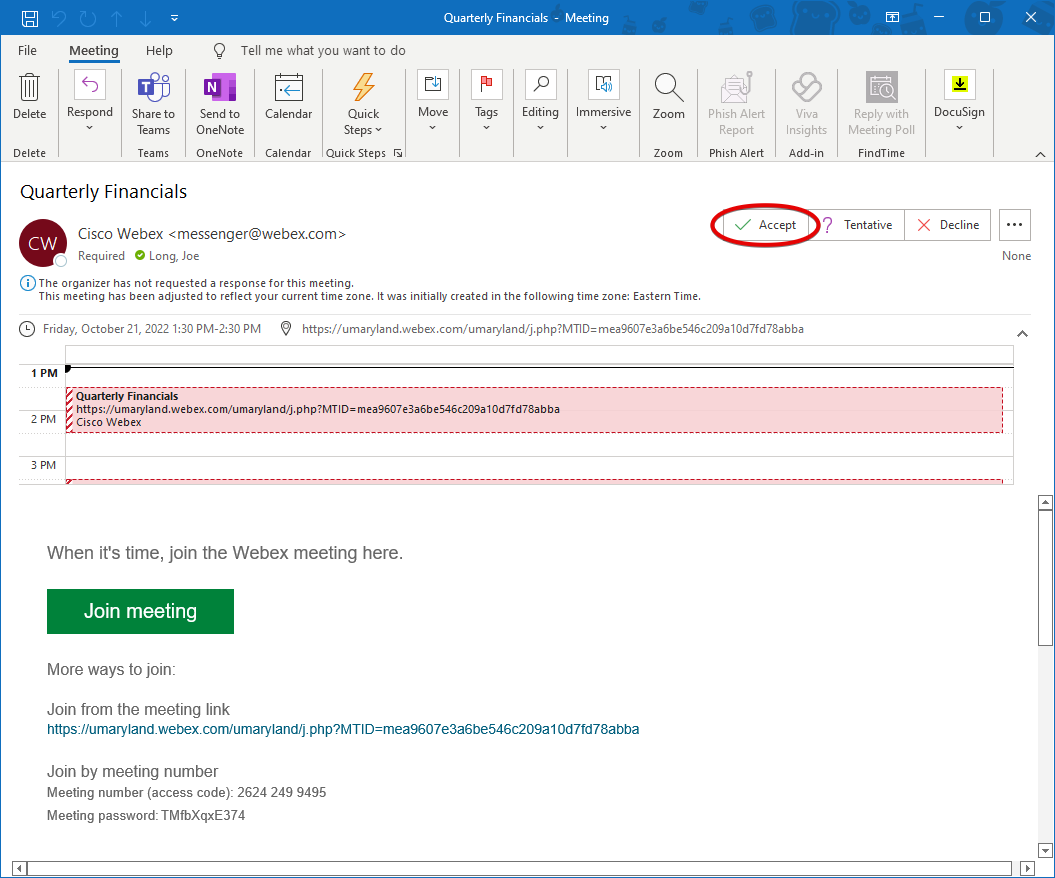
Click the calendar icon in the upper right. This will download a small file onto your computer.

Open this file, which will launch it as a new Appointment in Outlook. Accept the meeting, and it will be placed on your Outlook calendar.
Now open the meeting again from your Outlook calendar, and click the right arrow icon in the ribbon to forward the meeting. Enter in the recipients you'd like to invite, and then Send.
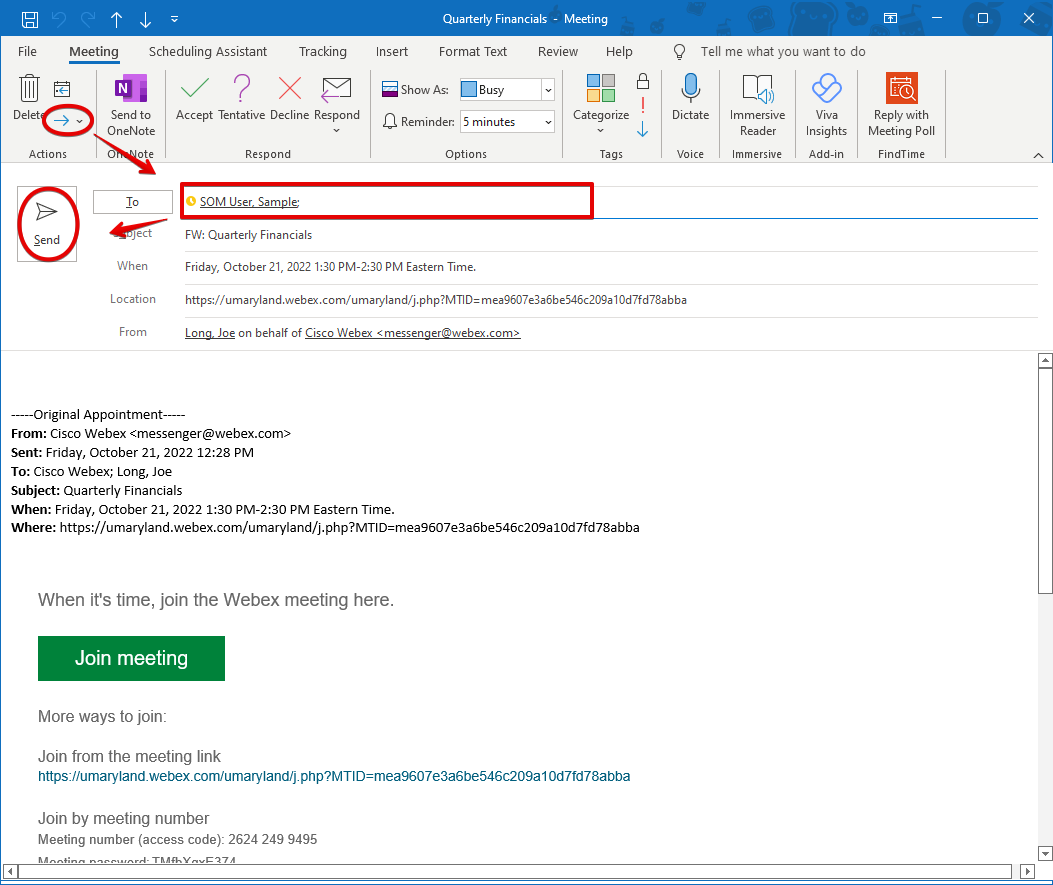
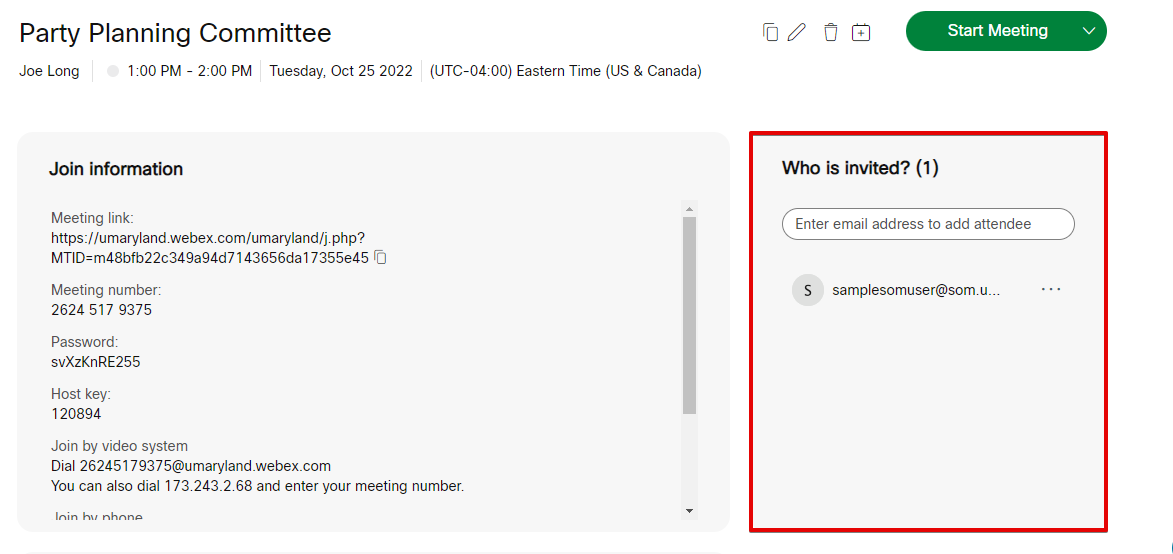
On the right, you've got a pane labeled Who is invited? If you add an email address here, that user will be sent an email inviting them to the meeting. They can respond yes or no. The difference between this method and the above method is that the invite will come from Webex, and only Webex will be notified of the user's response. You'll be able to see these responses when you start the meeting and click People to see all of your invitees, but Outlook will have no awareness of the invitees or their responses. The above method captures all of this information for Outlook. You're free to use whichever method you prefer, as long as you understand the difference.
How do I join an existing meeting?
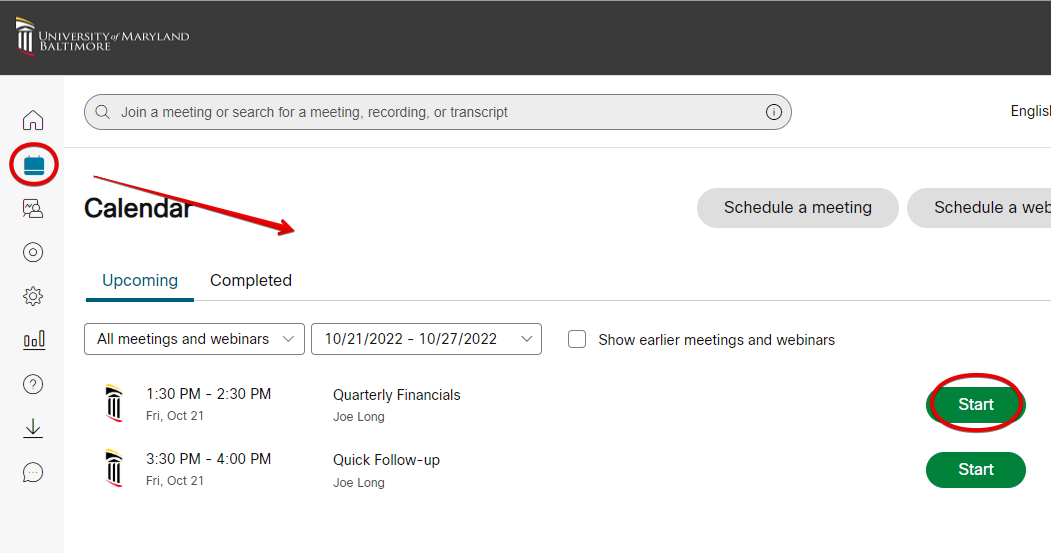
Go to Webex (https://umaryland.webex.com). Find your meeting on the home page, or go to the calendar icon on the left, find your meeting and click Start.
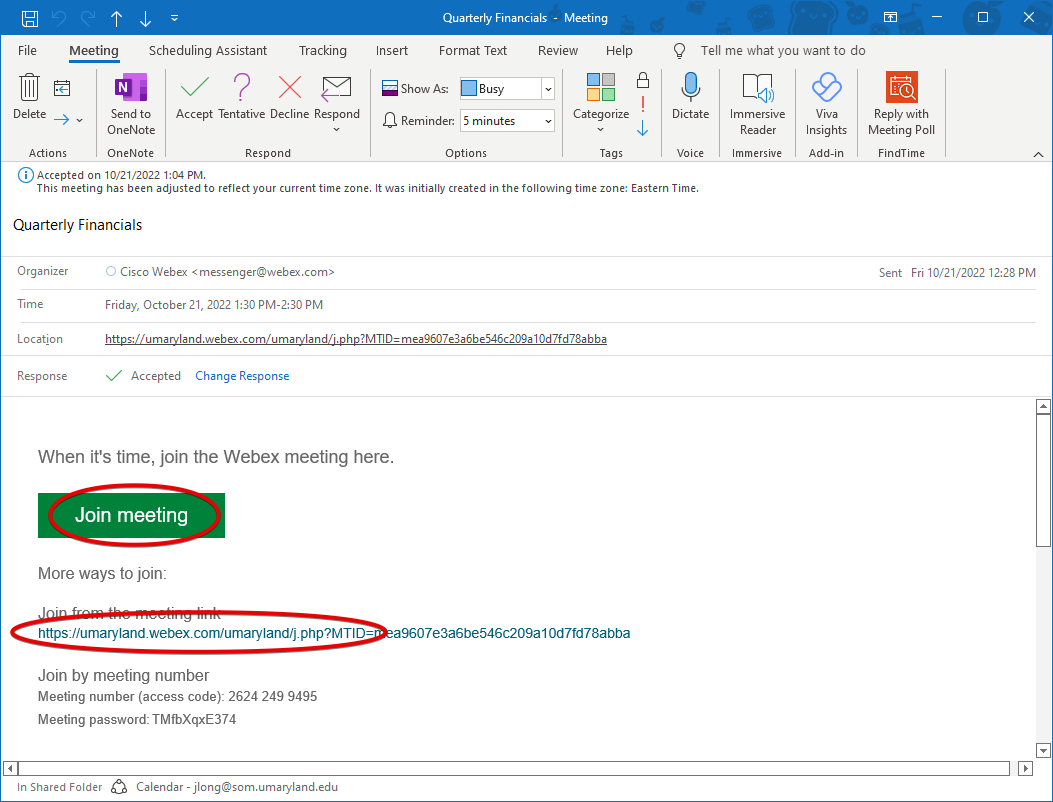
You could also open the Outlook event and click the meeting link.
This will launch Webex. You'll be given a chance to adjust your microphone and video options before you join. If you are the host, you'll have a Start Meeting button.
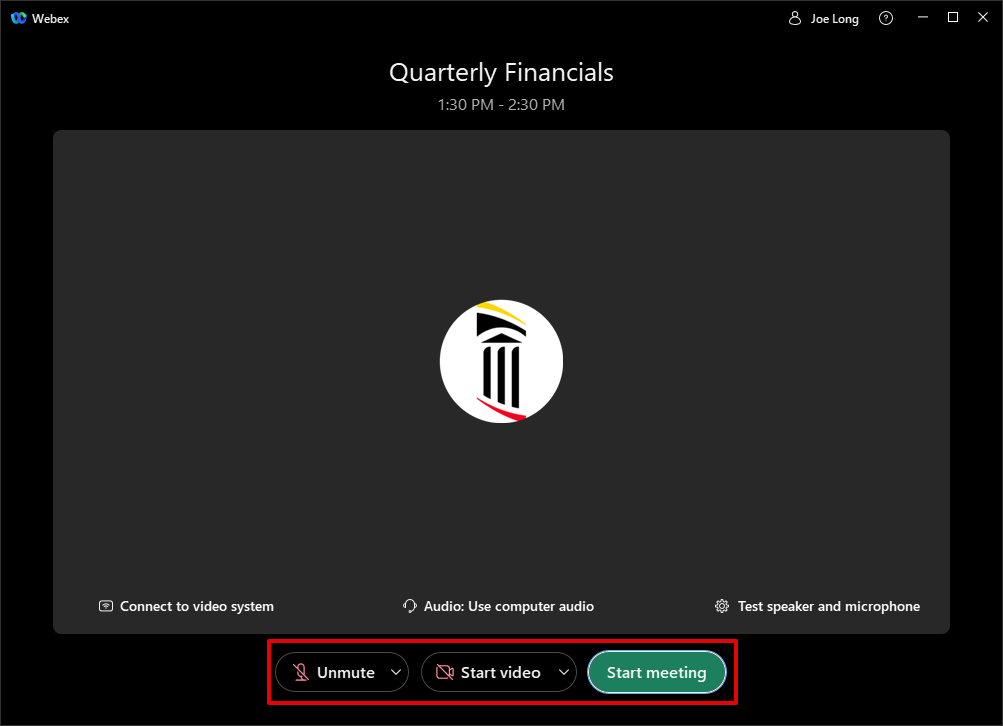
You will join with your audio on and your camera off, unless the host of the meeting had changed the default options.
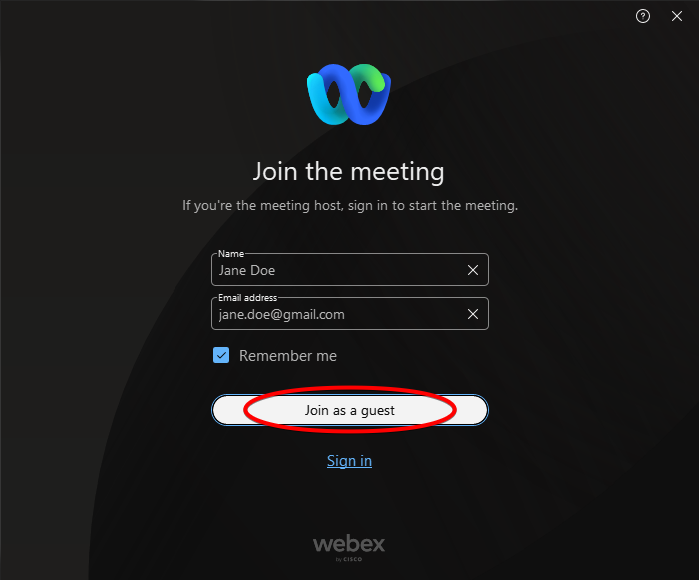
Guests—those who join your Webex call without an account—will be prompted to enter their name before joining.
How do I install and use the desktop app?
The first time you connect to a Webex meeting, you'll be prompted to either connect through a web browser, or install a small Webex agent which will improve your meeting experience. There is also a full desktop client that can help you create and organize your meetings, access chat history, and more.
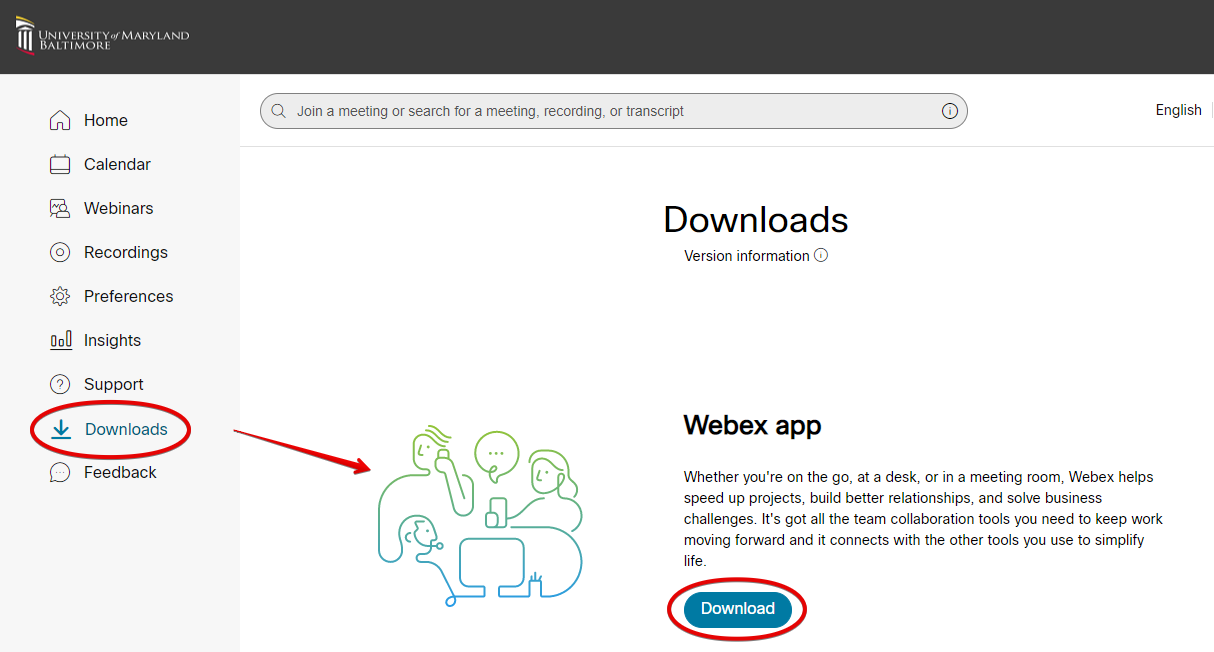
To download the Webex desktop app, go to https://umaryland.webex.com > Download. You will not need administrator access to install this.
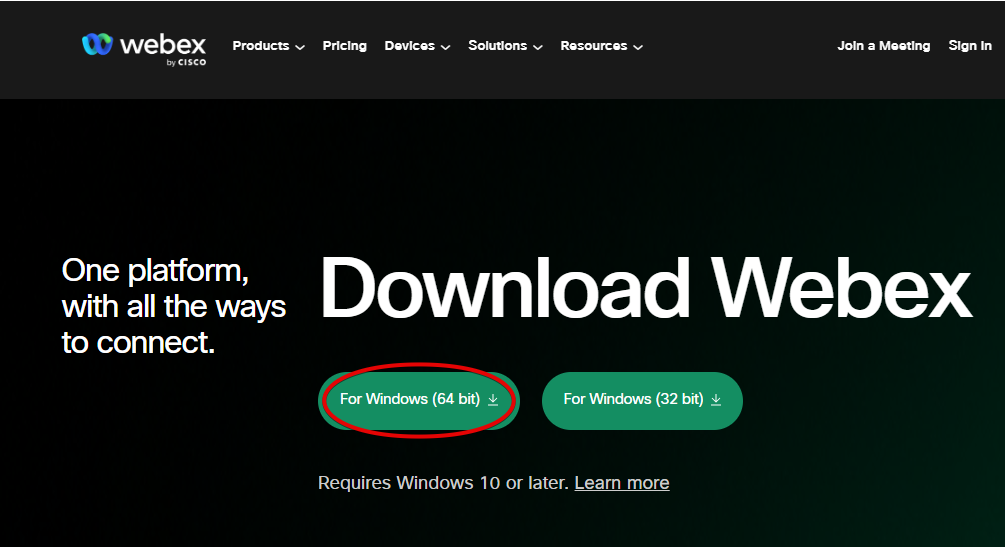
Now click For Windows (64 bit) at the top, under Download Webex. Run the file once it's downloaded.
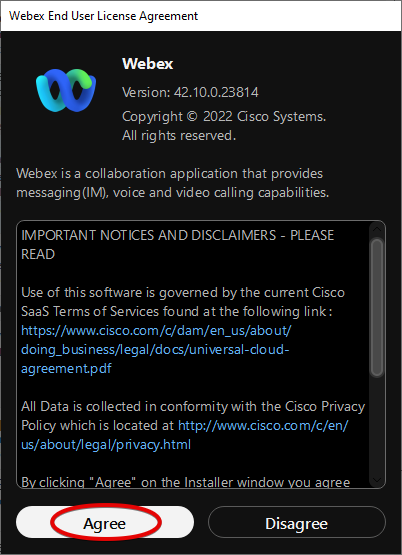
Accept the EULA.
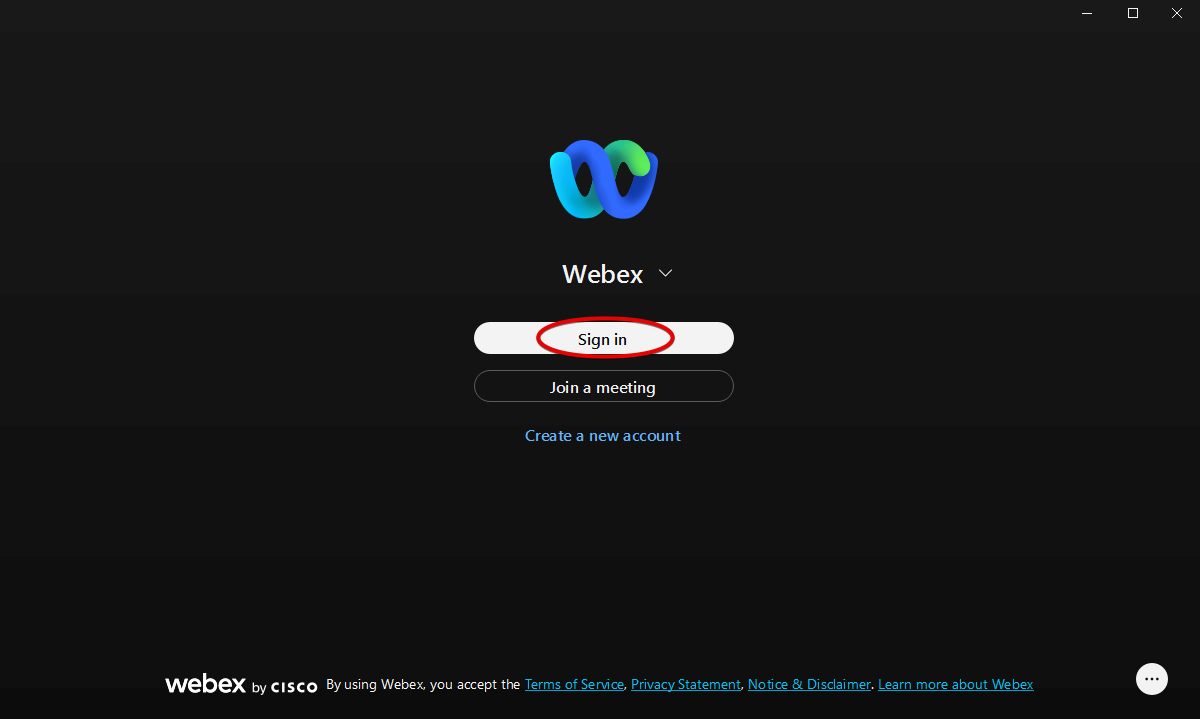
Once installed, you'll be prompted to Sign in.
Enter in your SOMID and click Next.
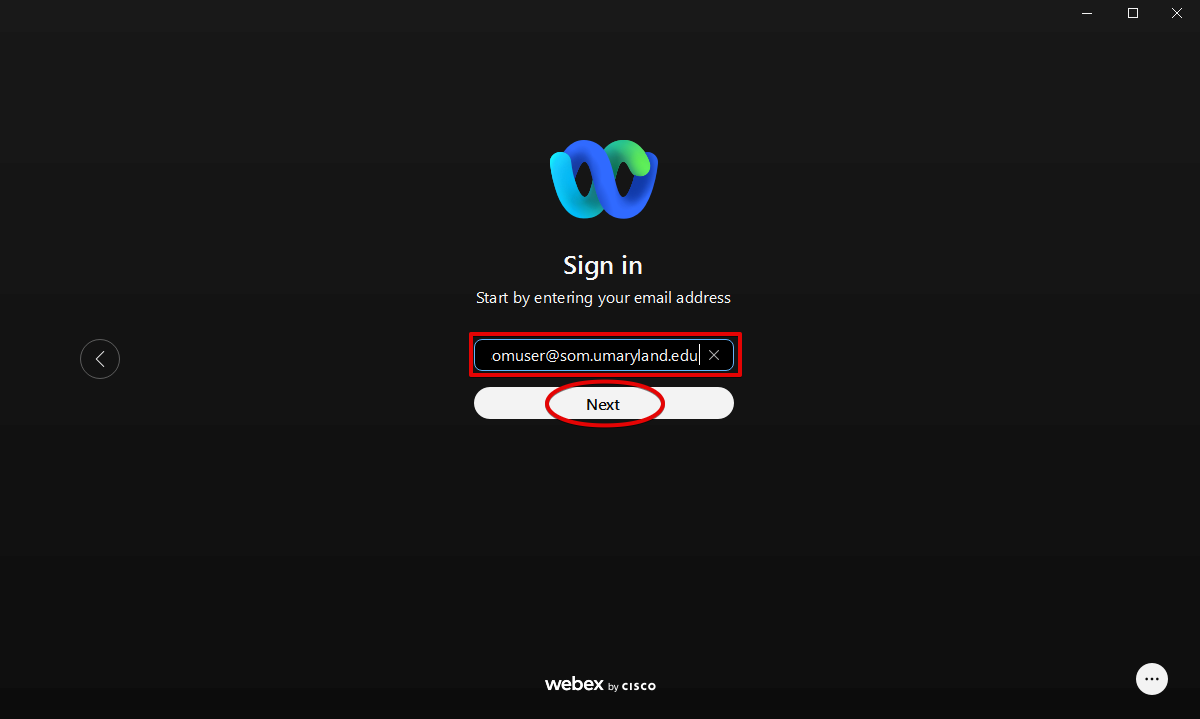
And then you'll be redirected to the UMID login page.

The landing page for the Webex desktop app is your chat history. Here you can see messages from previous meetings and direct messages with other users. Other tabs here include an address book, which will be empty by default, and Teams, which is similar to Microsoft Teams, where a group of people can have discussions together. Next you'll have icons for voicemail and recent meetings. Finally, the calendar icon will display your meetings.
Your Webex meetings should be displayed here. Click on one to join it.
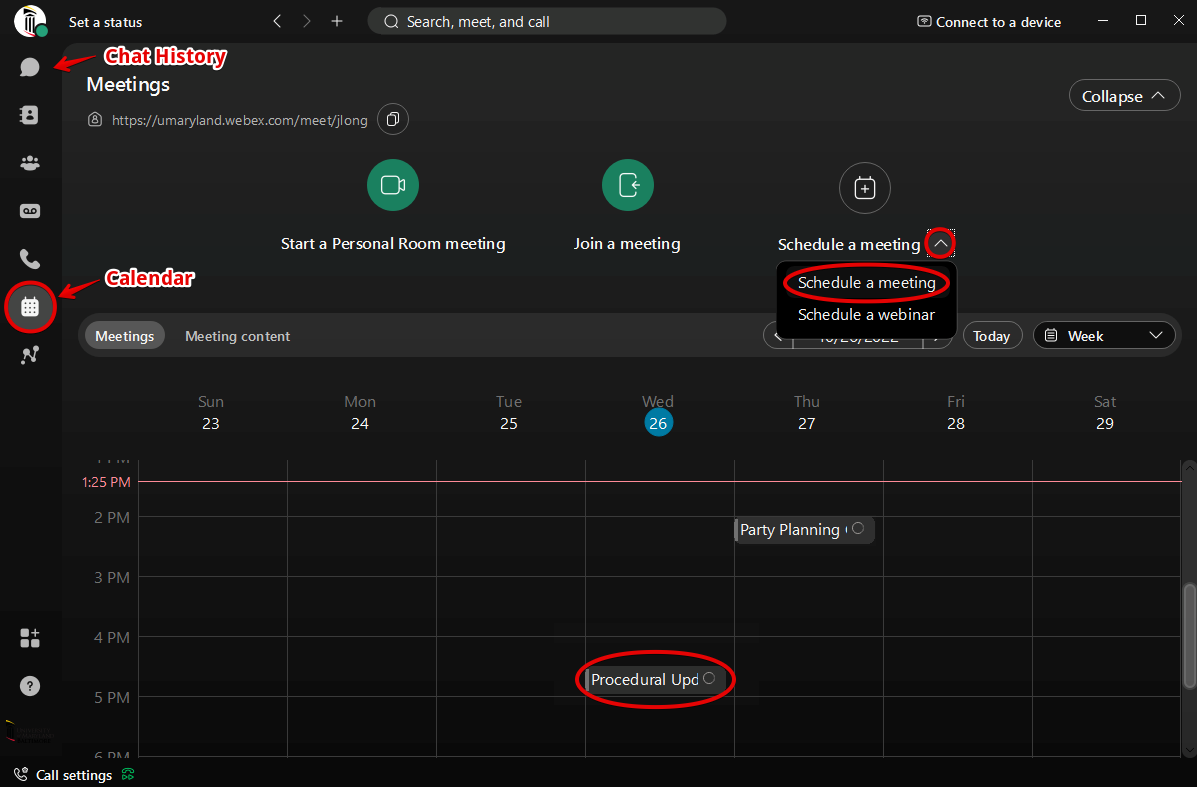
Click on Schedule a meeting here to create a new meeting. You'll find the same required fields as you're used to, and an Invitees field to send email invites to other users.
How do I install and use the Outlook plug-in?
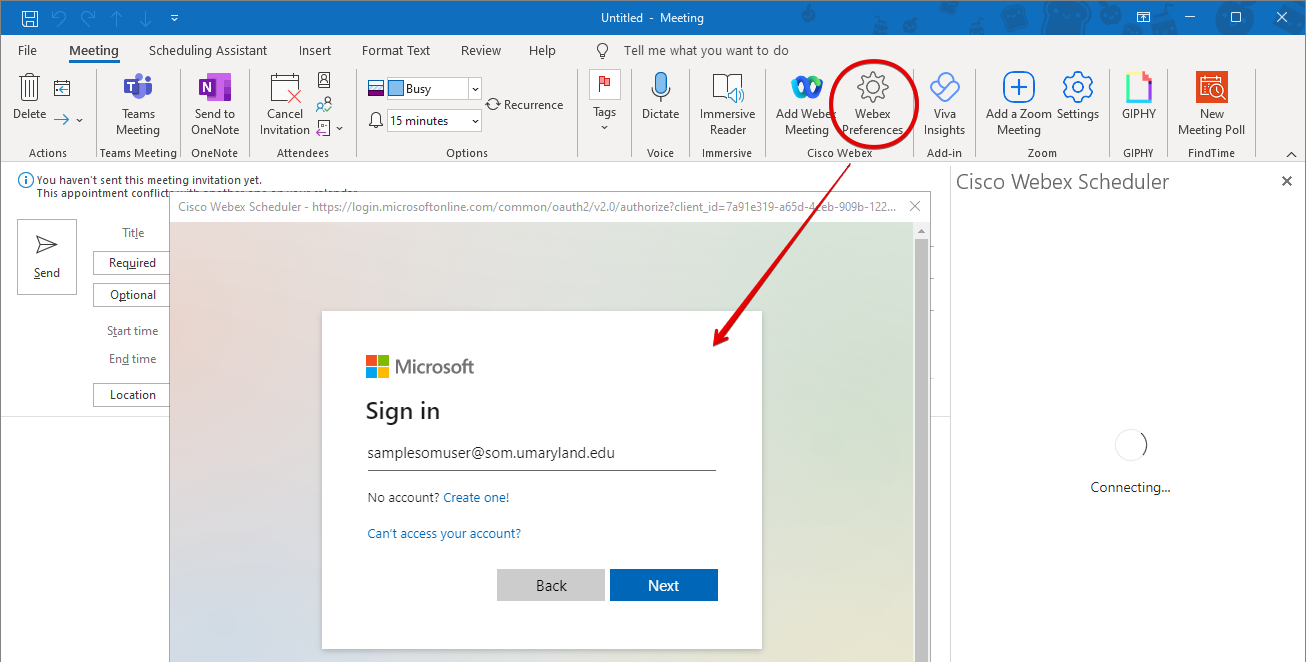
The Webex plug-in for Outlook is installed automatically for all SOM users. The Webex plug-in will only display when creating a new meeting.
Here's how to log in for the first time. Create a new meeting, go to Webex Preferences and sign in with your SOMID.
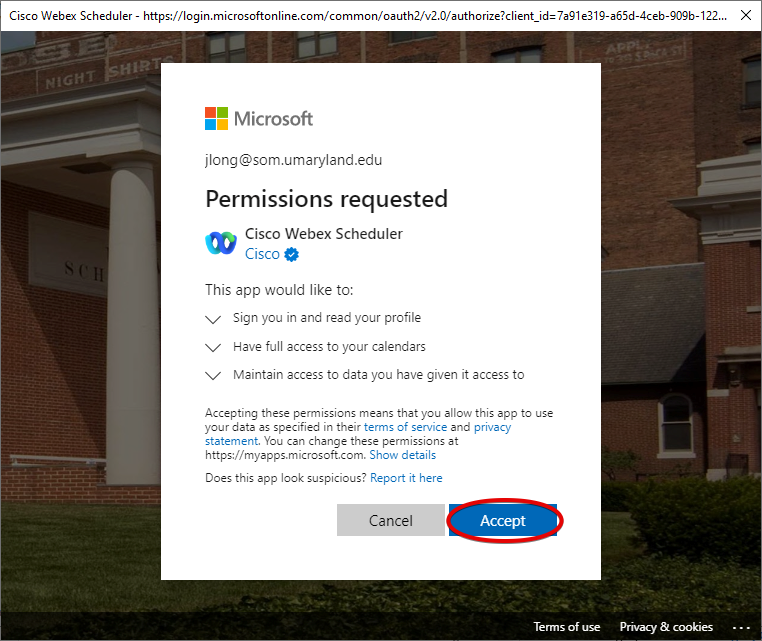
The first time you login, you'll need to grant Webex permissions to your calendar. Click Accept.
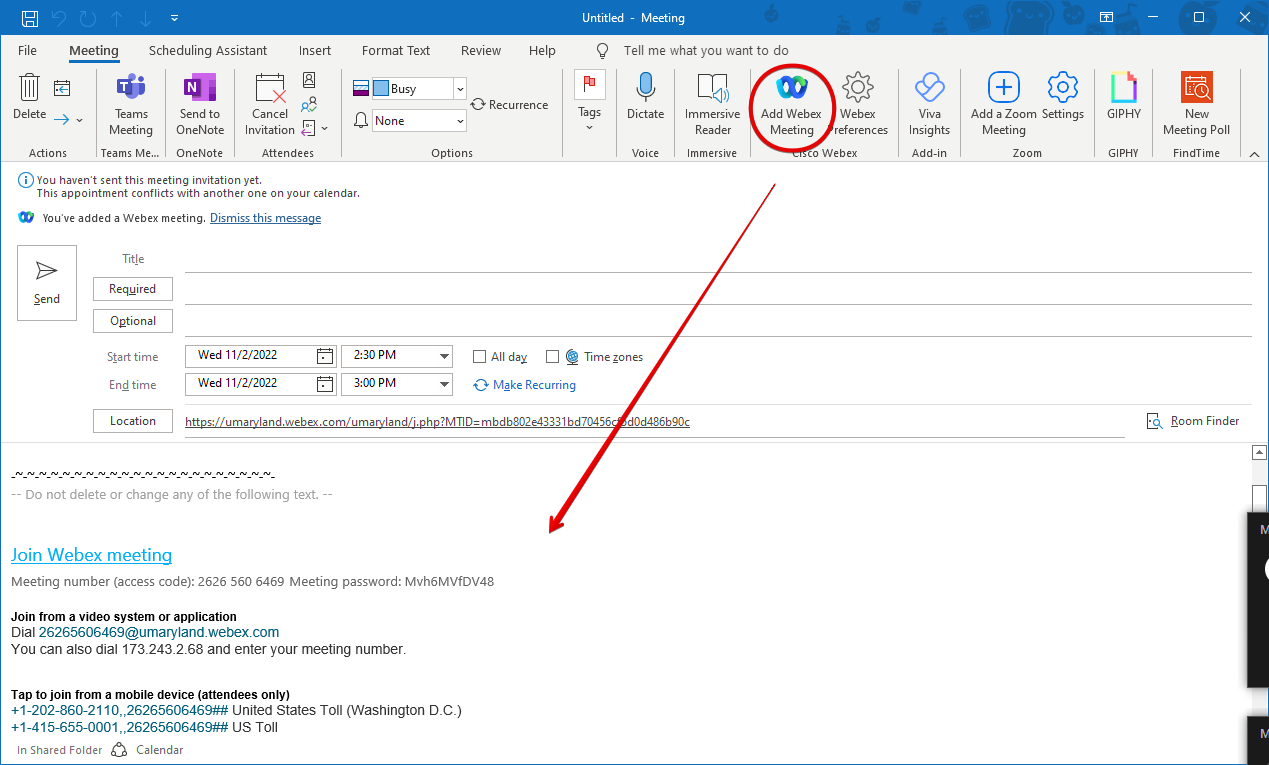
Now when you create a new meeting, click Add Webex Meeting. Webex meeting information will be added to your meeting. Don't forget to add the Title and Date/Time!
How do I share my screen?
When in a meeting, click on Share at the bottom of the screen. You'll have the option to share your entire screen (including your taskbar and desktop background) or just an application (i.e. Excel or Edge). Sharing an entire screen will also display any pop-up notifications, such as email notifications or Teams chats, during the screen-sharing process.
Unlike Zoom and Teams, you won't see a colored box outlining either your screen or window. The window will have a stronger drop shadow, and you will see Stop and Shared button in the upper right hand corner of the screen or app. Here is the Excel app shared.
If you wish to allow someone else to control your screen, that person should right click on the screen and choose Request Control. A notification will appear on your screen which you can allow or deny.
Click Stop button in the upper right when you are finished.
How do I access the chat?
Each meeting will have a chat log, though it is not displayed by default. This can be helpful if you want to ask a question without interrupting the speaker, or share a link or a document to everyone. Click the Speech Bubble icon in the bottom menu to display it. Click it again to close the chat.